Preface
The spring of 1941 found Britain approaching the second year of war with the European Axis powers. Her situation was desperate: her closest ally, France, had fallen the previous summer. The United States, though providing weapons and other vital materials, was still months away from entering the war. Britain more or less stood alone. Though there had been some triumphs (Battle of Britain, sinking of the Admiral Graf Spee, etc.), the margin for failure and defeat was still large.
Britain, as an island nation, relied heavily on foreign imports. Much of her desperately needed war supplies had to be transported by sea. This fact was well known to the German Reich’s Navy, the Deutsche Kriegsmarine. Led by Grand Admiral Erich Raeder, the Kriegsmarine had mounted a serious effort to disrupt supply convoys – the goal being to strangle and starve Britain into submission.
The most effective German weapon in this effort were submarines, or 'U-boats'. Between September 1939 and May 1941 these had been responsible for the destruction of approximately 3,000,000 tons of Allied shipping. In addition to the U-boats, Germany also employed surface merchant raiders and surface warships. Though few in number and not as successful as the U-boats, these ships did pose a credible threat.
The most recent German sortie, 'Operation Berlin' (January 1941), was a reminder of their potential. In this operation, the warships Scharnhorst and Gneisenau. (AKA 'the twins' or 'Salmon & Glucktstein') were responsible for sinking approximately 116,000 tons of Allied shipping. As a result, the Kriegsmarine surface units were monitored closely.
British Suspicions are Aroused
During the second week of May 1941 the British observed an increase in the number of German aerial reconnaissance flights between Greenland and Jan Mayen Island. It seemed likely that the reconnaissance was to ascertain the current limits of the pack ice in the region, but why this was vital to the Germans had to be determined. It was possible that the Germans were planning raids on Jan Mayen Island or Iceland itself. Another possibility was that this was a precursor to a breakout into the Atlantic by German surface warships – possibly even their newly worked-up battleship Bismarck.
On 14 May, Admiral John Tovey, Commander-in-Chief of the British Home Fleet, asked the British Flag Officer in Iceland for a report on the prevailing ice conditions as well as an assessment on the motive behind the German reconnaissance. The Flag Officer’s opinion was that the Germans were most likely planning for an Atlantic breakout by Bismarck.
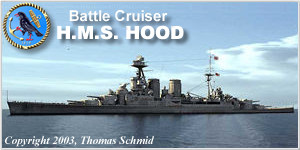
Bismarck and Hood
Launched on 14 February 1939, Bismarck was the first of the new breed of ships that German leader Adolf Hitler and Grand Admiral Raeder hoped would herald the rebirth of the German surface battle fleet in the tradition of the Kaiser's High Seas Fleet. Although listed as 35,000 tons to ensure that she fell within the limits of the London Naval Treaty, Bismarck did, in fact, displace well over that. As the image Comparison of H.M.S. Hood and Battleship Bismarck (below) indicates, she was of comparable size and main armament to the largest British warship of that time, H.M.S. Hood.

Above- Rendering of Bismarck by Thomas Schmid.
Click on image to learn more.
Above- Rendering of Hood by Thomas Schmid.
Click on image to learn more.
Despite the basic similarities, there were nonetheless serious differences between the two ships: Bismarck was a modern battleship in the truest sense. Her critical spaces were well protected by excellent internal compartmentalisation and high quality heavy armour. She also boasted state of the art electronics plus highly accurate and rapid firing gunnery systems. She and her sister Tirpitz were arguably among the best ships at that time.
In comparison, Hood was well-built for her day (1920), but by 1941 was nonetheless an aged ship. She had mostly adequate protection but she had a great deal of open spaces and lacked the compartmentilzation seen in more modern battleships. Though her speed had been reduced over the years, at 29 knots, she was still fast for her size. Her guns were deadly, but she suffered from outdated gunnery systems. She did boast advanced radar, but her crew hadn't much time to become proficient in its use.
Simply put, in a one-on-one fight, Bismarck could absorb more damage while firing faster and more accurately than Hood. Each ship had the ability to sink or severely damage the other, but Bismarck had an advantage. This is not totally a negative reflection on Hood, but simply an observance that Bismarck was 20 years more modern than she. Bismarck’s design reflected all that had been learned between the times the two ships were built. Of course, one must also factor in chance or 'luck," and this too, would play a role in the events that unfolded.
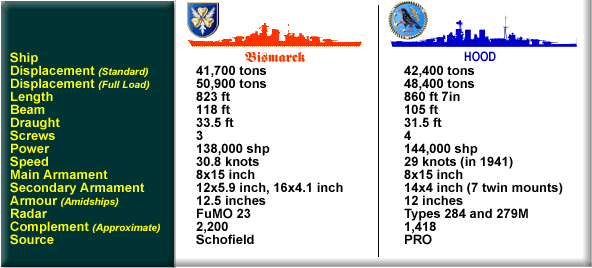
Above - Comparison of H.M.S. Hood and Battleship Bismarck
Bismarck Prepares for Service
Bismarck was commissioned on 24 August 1940, under the command of Kapitän zur See Ernst Lindemann. She commenced her acceptance trials in Kiel Bay on 15 September. Certain teething problems arose and Bismarck returned to Hamburg that December for the necessary adjustments to be made. Following an exceptionally harsh winter, Bismarck returned to Kiel Bay for further trials in March 1941. Having passed these trials, she was sent to Gotenhafen (formerly Gdynia, Poland). There she teamed up with the modified Admiral Hipper class heavy cruiser Prinz Eugen commanded by Kapitän zur See Helmuth Brinkmann. The ships' systems were fine-tuned and the crews properly trained in the relative safety of the Baltic in preparation for their first mission.
Preparations for Operation Rheinübung
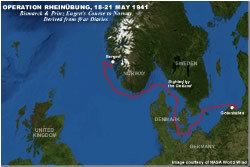
Raeder and staff were now making plans for that first mission – a commerce raiding sortie in the Atlantic: To lead the sortie Raeder chose Admiral Günther Lütjens. The stoic Lütjens was highly experienced and had a proven record as a fleet commander – his most recent success was as Commander of Gneisenau and Scharrnhorst during the aforementioned 'Operation Berlin'. Raeder’s original plan of action was to send Bismarck and Prinz Eugen into the Atlantic where they would be joined by Scharnhorst and Gneisenau. From there they would be able to attack and overwhelm even the largest of convoys. Such a fleet would be a menace the like of which the British had not had to contend with before during this war.
Unfortunately for Raeder, the plan had to be changed – neither of the 'twins' would be available: Scharnhorst had experienced boiler troubles and was undergoing repairs that would take weeks to complete. Gneisenau was damaged on 6 April during a torpedo attack by units of Britain’s Coastal Command. Her damage would take at least 6 months to repair. Accordingly, neither ship could be repaired in time to sortie during Raeder’s preferred time frame. As the Admiral in command of the force, Lütjens was consulted. He favoured postponement of the mission until Scharnhorst was repaired or the newly commissioned battleship Tirpitz was worked-up. Raeder however, was simply not willing to postpone the venture any longer. It was decided that Bismarck and Prinz Eugen would go it alone. Thus it was that on 18 May 'Operation Rheinübung' commenced in earnest.
Following a morning inspection by Admiral Lütjens, Prinz Eugen left Gotenhafen harbour followed sometime later by Bismarck. The vessels exercised in the bay off Gotenhafen and departed the area independently that evening. The two ships and a number of escort vessels linked up the following morning off the cape of Arkona.
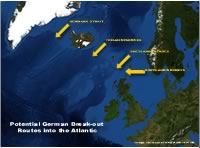
Potential Escape Routes.
Click to enlarge.
Bismarck had sailed 200 tons of fuel short of a full load as there had been an accident during her last refueling- a hose burst creating a large mess which had to be cleaned. Once things were in order, there was not enough time to finish fueling. There was also some worries about fumes following the deaths of several Polish labourers whilst cleaning her oil tanks. Gruppe Nord (German Naval Group Command North, or 'Group North') had advised Lütjens that the best course of action would be to proceed to Bergen in occupied Norway. A stop there would allow both ships to be refueled before entering the Atlantic. This was especially critical for Prinz Eugen as her endurance was not as great as that of Bismarck. They also suggested that fuel could be further conserved by entering the Atlantic via the Iceland/Faeroes passage.
Lütjens, however, decided not to follow Group North’s recommendation: Instead of stopping at Bergen, he intended for the ships to proceed directly to the Arctic and refuel from the tanker Weissenberg, stationed near Jan Mayen Island. From there, with full tanks, they would attempt a breakout into the Atlantic via the Denmark Strait. The likely reason for this change of plans was that Lütjens had an unfavourable experience using the Iceland/Faeroes route during 'Operation Berlin' – his ships had been detected there by the British cruiser Naiad. Having reversed his course, he then successfully entered the Atlantic undetected via the Denmark Strait. This route had also been used by other Kriegsmarine vessels during the early years of the war. The weather in the Strait was frequently poor and could possibly provide the cover needed to breakout.
Bismarck’s Baltic Passage. Click to enlarge.
Throughout 19 and 20 May, the German force and their escorting aircraft continued north and west through Scandinavian waters. Although Group North had attempted to keep the route clear of shipping in order to preserve secrecy, they were unsuccessful. Much to Lütjens’s dismay, there was a hole in Group North’s net: At approximately 1300 hours on 20 May, the neutral Swedish cruiser Gotland appeared on the horizon near the Swedish coast. For several hours, she steered a course parallel to the German fleet. Additionally, a few small fishing vessels were in the area.
Lütjens realised that his force had been exposed even before entering the North Sea. He knew that it was almost certain that Gotland would report what she had seen. It was highly likely the British would find out. As it turns out, this is exactly what happened: News of the German force’s movements had indeed been relayed to the British Admiralty – unofficially via representatives of the Swedish government and Norwegians in exile. Resistance operatives in Norway also monitored their progress up the Norwegian coast.
At this point, Lütjens once again changed his mind – the force would now follow part of Group North’s recommendation and put into Bergen, Norway. Though his motives are unclear, it is possible he felt that since his ships had been sighted and almost certainly reported by Gotland, he had lost the impetus and element of surprise. It would be best to refuel at Bergen and then later escape undetected under the cover of bad weather.
The German force eventually reached Bergen on the morning of 21 May. Bismarck anchored in Grimstad Fjord and Prinz Eugen anchored farther to the north in Kalvanes Bay. During the short stay at Bergen, both ships had their colourful Baltic camouflage and national markings (swastikas) painted out or otherwise covered. Prinz Eugen was refueled from the tanker Wollin; Bismarck, for reasons unknown, did not refuel. This decision would later prove to have fatal consequences for Bismarck and doom 'Operation Rheinübung' to failure.
Tovey’s Dilemma
Meanwhile, back at Scapa Flow, Admiral Tovey was considering the best means of covering a German warship breakout: On 18 May, the cruiser H.M.S. Suffolk, on patrol in the Denmark Strait, was ordered to keep a special watch on the passage close to the ice pack. On 19 May, H.M.S. Norfolk, flying the flag of Rear-Admiral (RADM) W.F. Wake-Walker, RADM Commanding First Cruiser Squadron (CS1), was ordered to proceed from Hvalfjord, Iceland and relieve Suffolk. Suffolk was to return to Hvalfjord to refuel and then rejoin Norfolk on patrol in the Denmark Strait.
On 21 May, Tovey received the report that Lütjens had suspected had been sent: The Admiralty reported that two large German warships in company with 11 merchant ships had been spotted the previous day near the Kattegat on a northward bound course. Later that day, came a further report that an RAF Spitfire on a reconnaissance mission had identified and photographed the enemy ships at Bergen – a Bismarck Bismarck class battleship in Grimstad Fjord and an Admiral Hipper Admiral Hipper class heavy cruiser in Kalvanes Bay.
Although the threat was positively located and identified, Tovey still had doubts as to the exact nature of the enemy intentions. If they were attempting a breakout into the Atlantic it seemed unlikely that they would stop at Bergen. However, dispositions were made based on the assumption that a breakout was planned. The following orders were issued:
- Suffolk, refueling in Hvalfjord, was ordered to delay her sailing to rejoin Norfolk to coincide with the earliest possible time of arrival of the enemy.
- Birmingham and Manchester were on patrol in the Iceland-Faeroes passage and were ordered to Skaalefjord to refuel before resuming their patrol
- Hood (commanded by Captain Ralph Kerr, flying the flag of Vice-Admiral (VADM) Lancelot E. Holland, VADM Commanding Battle Cruiser Squadron/Second-in-Command, Home Fleet) and the new battleship Prince of Wales (commanded by Captain John C Leach) were ordered to sail for Hvalfjord. Accompanying them would be the destroyers: Electra, Anthony, Echo, Icarus, Achates, and Antelope.
- Arethusa was on her way to Iceland and was ordered to remain there at the disposal of RADM Wake-Walker (RADM Commanding First cruiser Squadron in H.M.S. Norfolk).
- Tovey himself would remain at Scapa Flow in his flagship King George V until the situation became clearer. Also at Scapa were the cruisers Galatea, Aurora, Kenya, Neptune, together with the destroyers Active, Punjabi, and Nestor.
- The new aircraft carrier Victorious was also at Scapa Flow but was due to sail as part of the covering force for the Mediterranean bound troop convoy 'WS8B'. However, due to the threat from the German warships, Victorious was placed at Admiral Tovey’s disposal.
- Lastly, the battle cruiser Repulse, moored in the Clyde, was taken off 'WS8B' and also placed at Tovey’s disposal.
Apart from these initial ship dispositions it was critical that the movements of Bismarck and her consort continue to be tracked. To this end Tovey arranged for the RAF to undertake an extensive aerial reconnaissance from Trondheim to Kristiansand South early during 22 May. A bombing attack was also to be made on the enemy vessels. The weather however, was to thwart the RAF’s efforts: Eighteen bombers flew from Wick to attack the German ships at Bergen. Due to the rapid deterioration in weather conditions, only two of these found the target area. Thick clouds prevented them from seeing anything of substance and they were forced to release their bombs in the vain hope of a lucky hit. The reconnaissance aircraft had encountered similar conditions and could offer Tovey no additional information. He had to assume that the ships might have departed.
Hood’s Departure
Hood, Prince of Wales and their destroyer escorts, weighed anchor at 2356 hours. They departed Scapa Flow at midnight, 22 May, enroute for Hvalsfjord. They cleared Scapa’s Hoxa Gate at 0050 hours. Shortly thereafter, the destroyers were divided into two divisions- one to screen Hood and the other to screen Prince of Wales. The vessels then commenced zigzagging (for anti-submarine purposes) and assumed a heading of 310°. Sometime that morning, VADM Holland informed his commanders of the gunnery policy he wanted: 'If the enemy is encountered and concentration of fire required, the policy will be G.I.C. (individual ship control); if ships are spread when enemy is met they are to be prepared to flank mark as described in H.W.C.O. 26'. Due to the implementation of strict radio silence, these orders were never communicated to Suffolk or Norfolk.
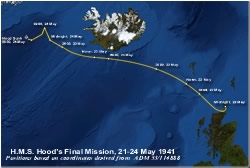
Hood’s course, 21-24 May 1941.
Click to enlarge.
Between 1130 and 1307 hours, a Range and Inclination Exercise (RIX) was successfully conducted. The first destroyer division continued to screen Hood and the second continued to screen Prince of Wales. Afterwards, all vessels resumed their zigzagging on a heading of 310°. This continued until 1855 hours, when the course was altered to 283°.
By noon, 23 May, the vessels would be at 62° 55' N 02° 14.8' W and on a heading of 270°. Shortly thereafter, another successful RIX was conducted. At 1400 hours, the destroyers Anthony and Antelope, short on fuel, parted company with the force and headed for Iceland. As the day wore on for the remaining vessels, the weather grew cloudy and the sea swells became heavier. The monotony was briefly broken at 1708 hours, when Prince of Wales's radar detected an aircraft. It turned out to be friendly.
The Veil is Lifted
Back at Scapa Flow on 22 May, Tovey was now faced with a decision about whether to sail himself. If the German fleet had left Bergen, they may already be nearing a breakout into the Atlantic. If he delayed sailing, then he may not be in time to assist in the battle to prevent the German breakout. On the other hand, if he sailed now and Bismarck was still waiting at Bergen for an improvement in the weather, he may find himself returning to port for lack of fuel at a critical moment.
To Tovey’s assistance came the small Naval Air Training Station at Hatston, Scapa Flow. The commanding officer, Captain Henry St. John Fancourt, thought it possible for a single aircraft to fly to Bergen to ascertain whether or not the German ships had sailed. Lieutenant Noel Goddard volunteered to pilot one of the base’s Marylands that were used for target towing. Accompanying Goddard would be the highly experienced navigator and observer Geoffrey Rotherham. Tovey’s permission for the venture was obtained, and at 1630 hours the aircraft took off. After a daring flight close to the sea, Goddard and Rotherham arrived at Bergen to find that the German vessels were no longer there. An urgent message was sent back to Hatston that Rotherham was able to confirm in person when he returned just before 2000 hours that evening.
So Admiral Tovey was at last certain that the German ships were no longer at Bergen, but the uncertainty about enemy intentions still remained. Various explanations could be offered about what might be taking place:
- The German ships may be leading a convoy containing important stores or troops to northern Norway.
- They may be part of a raiding force bound for Iceland.
- They may be attempting to break out into the Atlantic.
He felt that the last possibility was still the most likely. It was also the one that posed the greatest potential risk. Tovey knew that the German ships would wreak havoc on the convoys if they were to succeed in breaking out into the Atlantic. Also, once out they would be almost impossible to track down. They had to be stopped before they got into the Atlantic.
New plans were urgently formulated to give the Home Fleet the greatest possibility of intercepting the German ships before they broke out. It had been 29 hours since Bismarck had last been sighted at Bergen – depending on when they had sailed, they may, even at that moment, be close to achieving their Atlantic objective. The following directions were issued to update Tovey’s previous disposition orders:
- Suffolk at Hvalfjord, was ordered to sail immediately to join with RADM Wake-Walker in Norfolk, on patrol in the Denmark Strait.
- The cruiser Arethusa, also at Hvalfjord, was to join Manchester and Birmingham. The three cruisers were to patrol the Iceland/Faeroes passage.
- VADM Holland’s squadron of Hood, Prince of Wales and the destroyer screens were on their way to Hvalfjord to refuel before commencing their patrol. They were now ordered to proceed immediately to their patrol. They were to operate north of 62 degrees latitude and would be ready to react and cover the German ships should the cruisers patrolling either the Denmark Strait or the Iceland/Faeroes passage locate them.
Tovey himself sailed from Scapa Flow in his flagship King George V at 2245 hours on 22 May. They were accompanied by the aircraft carrier Victorious, the cruisers Galatea, Aurora, Kenya, and Hermione. The squadron also included seven destroyers (Inglefield, Intrepid, Active, Punjabi, Windsor and Lance). The group would be further reinforced off the Butt of Lewis when the battle cruiser Repulse and three more destroyers joined from the Clyde.
This latter squadron would act as a further backstop, operating behind Hood and Prince of Wales, south of the line of 62 degrees North latitude. Tovey gave consideration to detaching two of the cruisers of his squadron to patrol the Faeroes/Shetlands passage but decided against this. The chance of this passage being used by the German ships was small due to the proximity of the Home Fleet base at Scapa Flow in the Orkneys.
The naval units would be supported in their search by air reconnaissance patrols between Greenland and the Orkneys as well as sweeps along the Norwegian Coast.
Bismarck Leaves Norway
Lütjens’s force had sailed from Bergen during the early evening of 21 May. The poor weather conditions were perfect for an undetected departure. The question remains as to why he did not refuel Bismarck. It is possible that he initially intended to refuel from the tanker Weissenberg in the Arctic. It is also possible that as the hours passed, he felt it wiser to make for the Denmark Strait as quickly as possible, lest they lose the cover of the bad weather. Whatever his reason, it was another decision he would later regret.
During the morning of 22 May, the escorting destroyers parted company with Bismarck and Prinz Eugen. Lütjens’s force continued to steam north until the early afternoon, when the course was altered to northwest in preparation for the run through the Denmark Strait. The foggy weather continued to provide a shield from observation by British aircraft or surface vessels. At just before midnight the southwest turn that would take them through the Denmark Strait was executed. Later the speed of the squadron was increased to 24 to 27 knots in an attempt to ensure that the breakout was achieved before the favourable weather turned. This was the most dangerous part of the operation so far – the navigable channel was only 30 to 40 miles wide at this time of year. If the British had discovered their intentions there would be patrols. If the fog held, they might be lucky and slip through despite these. Unfortunately for the Germans, the conditions were changing. In the late afternoon the fog lifted and visibility increased to 3 to 10 miles.
Norfolk and Suffolk’s Patrol in the Denmark Strait
RADM Wake-Walker had arranged for Suffolk to join him at Isafjordur on the north west coast of Iceland after she had completed her refueling The two cruisers would then commence their patrol of the Denmark Strait. Their role would, of course, be to locate Bismarck and Prinz Eugen and keep contact with them – there was no question of Wake-Walker’s ships engaging the German squadron as they would be clearly outgunned. The cruisers would patrol down the Strait in a south westerly direction and then reverse course towards the north west. This would continue until the German ships were seen or enough time had elapsed to ensure that they were not heading out into the Atlantic via this route. It was always possible of course that the German ships would be located using another route and that Wake-Walker would be called to assist.
The patrol began mid-morning of 23 May. Both cruisers were fitted with radar equipment (R D/F) but that on Suffolk was far superior to that on Norfolk. Suffolk’s radar was multi-directional with a range of 13 miles which enabling her to sweep in all directions except a blind spot at her stern. In contrast Norfolk was fitted with fixed R D/F allowing her to see ahead only. For this reason Suffolk was chosen to patrol on the Greenland side of the Strait. She would keep the ice at the limit of her radar, which would allow her room for manoeuvre should the German ships be sighted. This protection was further enhanced by the fog conditions that day – it was clear over Greenland and the ice pack, but a bank of fog was clinging to the Icelandic coast. This fog would provide a blanket of protection into which the British ships could slip once contact with the enemy was established. Norfolk, with her fixed equipment, patrolled from the Iceland side of the Strait only.
The patrol continued throughout the day and into the early evening. At roughly 1915 hours, whilst Suffolk was on her south-westerly run, the uncertainty was suddenly ended: Able Seaman Newell was on duty as the starboard after look out. He was there to cover the 'blind' zone in Suffolk’s radar coverage astern. As he scanned the horizon he saw Bismarck, and then Prinz Eugen roughly 7 miles away. He immediately called out 'Ship bearing green one four oh', followed seconds later by 'two ships bearing green one four oh'. The reaction was swift as Suffolk heeled over to port to seek the cover of the fog bank. Further encouragement was found by the fact that Bismarck did not open fire on Suffolk. Signals were sent out to say that contact with the enemy had at last been made.
Norfolk, hiding within the safety of the fog, picked up Suffolk’s report. She steered to take up position at the edge to the fog to assist in keeping contact. She strayed too close to the edge of the fog bank however, and cover was briefly lost. Bismarck spotted her and immediately opened fire. Norfolk was straddled, but was able to safely regain the cover of the fog bank. It was the first time the new German battleship had fired salvoes in anger and it served as a warning to the British of the deadly accuracy of Bismarck’s guns.
Luck seemed to be running with the British: Contact with the enemy squadron had been achieved. Although the Germans knew that they been found, neither British ship had been damaged in making contact. Furthermore, contact could be safely maintained by means of Suffolk’s radar from the cover of the fog bank. It was now just a question of ensuring that British heavy ships could be guided towards the enemy.
Continued in Part 2 (click on the link below)