Hood Avenged- The Defeat of Bismarck
While the survivors were recovering from their ordeal, Hood was finally avenged. In a truly epic naval 'fox hunt on the high seas', Bismarck was hunted down and thoroughly defeated by the Royal Navy: Following the morning’s success against Hood and Prince of Wales, the damage to Bismarck was fully assessed. She had taken three 14 inch shell hits from Prince of Wales. The combined effects of two of these hits resulted in a serious fuel leak and reduced speed capacity. Surely Lütjens regretted not refuelling Bismarck at Bergen. Now there was no viable way for the operation to continue as planned – Rheinübung in its present form was over. Though Hood was lost, VADM Holland had achieved the objective of stopping Bismarck’s mission.
The decision was made that Prinz Eugen should escape and attempt commerce raiding on her own, whilst Bismarck proceeded to occupied France. On the afternoon of 24th May, Bismarck turned back towards her shadowers – this disrupted their coverage long enough to permit Prinz Eugen to escape undetected. Shots were exchanged between Bismarck and Prince of Wales, but no hits were scored. Bismarck then resumed her course. Late that evening, Swordfish aircraft from H.M.S. Victorious, were launched against Bismarck. Although they did score one torpedo hit, no significant new damage was achieved. It only succeeded in slowing Bismarck down a bit (the temporary repairs made after the Denmark Strait battle had come loose or were damaged as Bismarck manoeuvred to dodge the torpedoes).
On 25th May, Bismarck was once again able to shake off her pursuers, this time by cleverly looping around them. After losing radar contact with Bismarck, the British attempted to locate her using radio direction finding gear. Based on misplotted raw direction finder data, it was erroneously assumed that Bismarck had turned north to effect a return to Germany. Accordingly, Tovey turned his force in that direction. Meanwhile, Bismarck had actually continued on course to France. For reasons unknown, Bismarck foolishly poured out long radio messages to Germany. Once again using radio direction finding gear, the British soon got a better (but still rough) idea of Bismarck’s position. Based on this, Tovey realised that Bismarck had not turned and was apparently headed directly for France. By the time this mistake was realised, Bismarck had a lead of at least 150 miles. Unless something was done to slow her down, it would soon be within the range of U-boat and Luftwaffe protective screens.
On the morning of 26 May, Bismarck’s precise position and heading were at last confirmed by an American exchange officer piloting a British Catalina flying boat. Meanwhile, Tovey, in King George V had linked up with the battleship Rodney and began to pursue Bismarck, which was 130 miles / 240 km ahead of them. That evening, the cruiser Sheffield caught up to and began shadowing the wounded German giant. Also that evening, another Swordfish torpedo attack was launched, this time from Ark Royal. Unfortunately, the aircraft mistakenly attacked the Sheffield! Luckily for everyone concerned, all of the torpedoes had faulty magnetic firing mechanisms and exploded prematurely on contact with the ocean. The mistake realised, the Swordfish returned home and were made ready for another attack – this time with contact fuses on the torpedoes. In addition to the near fratricide incident, Sheffield also came under fire from Bismarck that evening. She received notable splinter damage and several casualties (3 men died).
Swordfish from Ark Royal struck once more that evening – this time with significant results: At least one hit was achieved on Bismarck’s stern. The result was that one or more of its rudders were jammed to port. Attempts were made to free the rudders and to steer using her screws, but to no avail. Virtually unmanoeuverable, Bismarck soon began to turn in the direction of Tovey's battleship force. To make matters worse for Bismarck, there would be no rest for her weary crew- the wounded behemoth was continuously harassed by British destroyers through the night. Though not directly struck, the destroyers received damage and suffered casualties (including 2 fatalities). Bismarck was untouched, but her crews psychological state was certainly affected.
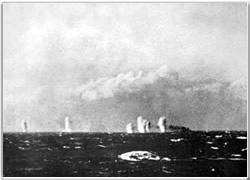
Bismarck during her final battle.
During the morning of 27th May, a combined British force, led by King George V and Rodney, finally caught and engaged Bismarck. The German battleship, its rudders jammed, was unable to manoeuvre effectively. Neither she nor her tired crew was in peak condition at this point. The result of this was that in the ensuing action, Bismarck was quickly and inevitably overwhelmed.
She did manage to straddle both Rodney and King George V early on, but scored no direct hits. The British made quick work of the crippled ship and it was soon a slowly sinking, blazing wreck. At approximately 1039 hours, it was at last sent to the bottom by combination of the torpedoes of H.M.S. Dorsetshire, and earlier German scuttling efforts. Who actually sank the ship is a moot point in that by this point she was already defeated and permanently out of action.
In the end, the German death toll was approximately 2,131 (per a recent German recount of Bismarck casualties). Only 115 of her men survived. Of these, 110 were rescued by British warships (1 of which died the following day) and 5 were picked up by German/Axis-friendly ships. The death toll would have been somewhat lower, but the British were forced to break-off their rescue attempt – a suspicious 'smoking discharge' was sighted in the water and the rescue vessels departed the scene for fear of U-boat attack. This understandable but highly controversial and regrettable action left hundreds in the cold water. Some estimates put the number as high as 800, but this is mere speculation. The abandoned men either drowned, died of hypothermia or from their wounds. Although relieved that the German threat had been nullified, the survivors of Hood were not overjoyed at the news - they fully understood what the crew of Bismarck had gone through.

Above- The Primary Ships Involved in Bismarck's Final Action
As for Prinz Eugen, she had no success on her own. Suffering from engine/mechanical problems, she was forced to steam into Brest, France on the 1st of June. Thus ended 'Operation Rheinübung'. As it turned out, Hood’s loss aside, 'Operation Rheinübung' had proved a total failure for the Germans. In fact, in some ways, it was a victory for Great Britain, albeit an extremely bitter and costly one – Hitler never again allowed his surface fleet to attempt such an ambitious operation. Though they would still be used in the Baltic and in the waters off Norway, they were never again a realised threat to Atlantic shipping.
Homecoming
The three survivors of the Hood were disembarked at Greenock on 29 May. After being provisioned with new uniforms and gear, they were whisked by train to London. After an interview with Vice-Admiral Whitworth, formerly of Hood himself, the men were all placed on indefinite survivors leave. They were told not to report until told to do so (for the enquiry). Ted Briggs was in fact to return earlier than this. Note: Anyone interested in Ted’s unique first hand recollection of his time in Hood, both good and bad, should buy a copy of his book 'Flagship Hood' (or read the transcript here).
The First Board of Enquiry
The first enquiry was convened in early June. They quickly reached the conclusion that one or more shells from Bismarck had managed to penetrate Hood’s armour/protective plating and detonate her aft magazines. Although it was a logical conclusion, the proceedings came under scrutiny: As it turned out, very few witnesses were called, and of the Hood survivors, only William Dundas gave evidence. Verbatim records of the evidence were not made and to make matters worse, the appropriate experts (on explosives, etc.) had not been called. It was not long before the Admiralty decided that a second board would have to be convened.
The Second Board of Enquiry
The second Board convened on 27th August 1941 under the Chairmanship of Rear-Admiral H.T.C. "Hooky" Walker, himself a former Captain of Hood. This board called two of the three survivors (Ted Briggs and Bob Tilburn), numerous eyewitnesses from Prince of Wales, Suffolk and Norfolk. It also called experts in the fields of construction and armament/explosives. Although far more comprehensive and thorough than the first enquiry, the second Board ultimately reached much the same conclusions as the first Board – A salvo from Bismarck penetrated Hood’s vitals and detonated the aft magazines. Other possibilities exist, but a shell from Bismarck was felt to be the most likely cause.
The Discovery of Hood’s Wreck
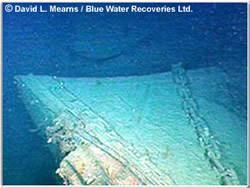
In July 2001, a team led by David L Mearns located Hood’s wreck approximately 9,200 feet below the surface of the Denmark Strait. The team also visited the wreck of Bismarck. In the case of Hood, the condition of the wreck confirmed that a catastrophic event involving the aft magazines did indeed cause the destruction and sinking of the ship. The damage was actually much more severe than initially expected- not only was the stern detached, but the bow (seen in the photo to the right) was separated from the main hull as well.
For detailed photos and an in-depth description of both the Hood and Bismarck wrecks, please see our article on The July 2001 Channel 4 Expedition to Locate and Film the Wrecks of Hood & Bismarck. You can also consult the findings of the Society of Naval Architects and Marine Engineers (SNAME) review of wreck materials - A Marine Forensic Analysis of HMS Hood and DKM Bismarck.
The wreck has been visited twice more thanks to generous funding by Microsoft co-founder and philanthropist Paul Allen: In August 2012 David Mearns led an unsuccessful attempt to retrieve Hood's main bell. This was later followed by a second attempt in August 2015. THis time, David and the team were successful. The bell was retrieved and was ultimately placed into the custodianship of the National Museum of the Royal Navy, where it underwent conservation and was put on display. You can read more about the 2015 mission here.
References, Sources & Recommendations
British Records and Documentation:
- ADM116/4351- Enquiry into the Loss of Hood
- ADM116/4352- Captain Leach’s narrative of Prince of Wales’s operations against Bismarck
- ADM234/509- Sinking of the 'Bismarck', 27 May 1941: Official Dispatches
- ADM234/509- Admiral Tovey’s dispatch regarding the action against Bismarck
- ADM234/509- Prince of Wales’s Gunnery Aspects Report
- ADM234/509- H.M.S. Suffolk Operations 23-26 May 1941
- ADM234/509- H.M.S. Norfolk Gunnery and R.D.F. During Operations Against "Bismarck"
- ADM234/510- Plans and maps related to the operations against 'Bismarck'
- AIR14/415: Report on the Sinking of the Bismarck
These files are Crown Copyright and are held at The National Archives, Kew, London. They are posted here by kind permission of The National Archives.
German Records and Documentation:
- Kriegstagebuch Des Schlachtschiffes Bismarck (Reconstructed Bismarck War Diary)
These documents were obtained primarily through the United States National Archives (NARA II). - Prinz Eugen Rheinübung-Related Records
These documents were obtained primarily through the United States National Archives (NARA II). - "Schmalenbach" Film of the operation
This is courtesy of Thomas Schmid and the Prinz Eugen’s veterans association - Bismarck Crew List
Personal Interviews and/or Published Accounts:
Hood survivors Robert Tilburn and Ted Briggs, Bismarck survivors Baron Burkard von Müllenheim-Rechberg and Josef Statz plus Prinz Eugen crewmen Paul Schmalenbach and Fritz Otto Busch. Correspondence from Colin McMullen of Prince of Wales was also examined. We also consulted other 'classic' books such as 'Pursuit' by Sir Ludovic Kennedy, 'Alarm Starboard' by Geoffrey Brooke and 'The Navy at War 1939-1945' by S.W. Roskill for anecdotal evidence/inputs. We'd also like to thank author Maurice Northcott for his many contributions to this article.
Additional Resources for Battle Researchers:
- Battle of the Denmark Strait Research Materials
A page on this site containing links to the above documents as well as other Denmark Strait specific information and battle theories. A "one stop shop" for information on the Battle of the Denmark Strait. We highly recommend that anyone wishing to seriously learn about this battle should study the materials listed in this resource.