
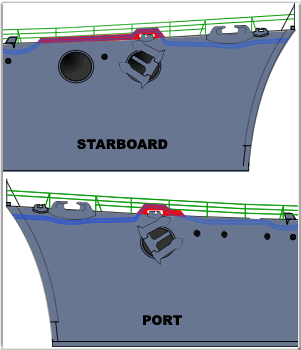
Above- Box contents
Kit Background
The 1970s saw 1/700 scale waterline ship models increase in popularity within the naval modelling community. Unfortunately, in a scale dominated primarily by Japanese naval subjects, there was little in the way of British Royal Navy offerings. Towards the later part of the decade, Tamiya stepped in to help fill this void. They eventually designed and released five major Royal Navy warships- Nelson, Rodney, King George V, Prince of Wales and of course, the subject of this article, the battle cruiser H.M.S. Hood.
Tamiya’s British warships would prove to be some of the better 1/700 scale injection moulded plastic ship kits made by any manufacturer for years to come. Tamiya’s Hood would also go on to become one of the most popular and widely available (either singular or packaged with an “E” class destroyer) models of the battle cruiser ever produced. It would not be surpassed in terms of accuracy until the advent of Trumpeter/Pit Road’s 1/700 scale 1941 Hood.
Moulding & Detail
The completed model depicts Hood as she looked during her ill-fated battle with Bismarck and Prinz Eugen on 24 May 1941. The kit consists of various sprues, hull, waterline plate and detailed assembly instructions. It appears to be largely correct or at least quite close in terms of its size/dimensions.
There is a great deal of detail present in this kit, but at the same time it is also very plain in key areas. There are minimal portholes/scuttles, very few doors and practically no ladder ways. One key area in which this kit excels is the quality of the mouldings. Most are very clean and crisp with an almost total absence of flash, sink holes and/or ejector marks. The kit, if built as-is, assembles fairly easily with minimal fit and finish problems. This means that modelers with basic experience can build an adequate/acceptable model of Hood straight from the box if so desired.
Although this model is adequate, it by no means the most accurate model of the ship as sunk. This is simply because the kit is based upon outdated information. Since the time it was designed three decades ago, a great deal of new and/or previously overlooked information concerning Hood has come to light. Additionally, there are some errors/omissions that should have been caught/addressed when the model was originally designed. In short, it’s an "okay" model as-is, but if you want it to be truly accurate, it will take a fair bit of work.
Important Note- First, please understand that the purpose of this review is not to berate Tamiya or it's models. On the contrary, I am a big fan of Tamiya's work. Indeed, their newer kits such as Prinz Eugen and Repulse are, in my opinion, the best in the business. With this in mind, I sincerely hope they see this review and retool their Hood (though I admit this is unlikely). So, what I say here is not to "bash" them or their kit, but to simply point out problems so that you, my fellow modellers, can take corrective steps if you wish. If you want to know how to make this model more accurate, then please read on. Notable errors, new information plus suggestions on how to correct the kit are covered below.
Corrections & Suggestions for Improvement
Hull
 This part is largely correct in overall size. It does suffer from some major shape and detailing problems though. These are listed below:
Armour Belt & Torpedo Bulge- There is a total absence of armour belt and torpedo bulge detail. At this scale, these would be quite noticeable. Tamiya included the armour belts on their other 1/700 British capital ships. Why they chose not to pursue this same feature with Hood is beyond me. Luckily, this can be remedied by carefully applying very thin plastic strip stock, or through creative painting (layering or highlighting/shading).
Portholes/Scuttles- Some of these are missing or are otherwise not precisely positioned. This minor issue can be remedied with a steady hand and a pin vise/drill.
Degaussing Cable & Fairing's - The degaussing cable is under-detailed and in some areas, incorrectly shaped. This is relatively minor, but I recommend removing it and replacing it with aftermarket photo etch or very slim strip styrene. Additionally, it will be necessary to reshape the fairings that pass above the anchor hawse pipes. These were shaped differently on the actual ship. This is a very simple fix. The image to the right illustrates the correct shapes.
Stern Sheer- This is a major issue and one that may prove difficult to remedy. On the Tamiya model, this area is level. On the actual ship however, the stern swept upward as it stretched rearward (a bit like a canoe…though nowhere near as extreme). It is surprising that such a major mistake was made by Tamiya. It may be possible to somehow shim or push it into the correct shape, but take great care to keep the waterline plate flat/level and portholes properly aligned. Click here to see a photo illustrating the stern sheer.
Waterline Plate- This does not mate to the hull very well. This can be remedied by widening the circular slots on the underside of the hull (particularly the two amidships slots). This will allow the pieces to join together easily. Of course, its at this point that the second problem with the base plate becomes apparent- it does not stay flush with the hull all the way around. Fortunately, this can be remedied through the use of putty or plastic strips. Pay particular attention to the very forward point of the plate.
Decks
 Forecastle (Focsle) - The focsle deck comes in two sections. The first is a small deck insert (part A9) that is placed in the hull at the very forward end. The second is actually moulded into the hull itself. The hull portion begins with the second breakwater at "B" barbette. Most of the hatches and equipment are laid out roughly in the proper positions. There are some slight variations from the actual ship. My only suggestion here would be to drill out the deck hawse pipes and connect them to the hawse pipes in the side of the hull. It would also be good to remove the moulded on anchor cables/chains and replace them with photo etch
- Paravane Houses - These are the small angular buildings immediately behind the first breakwater on part A9. As you can see in the photo of the actual ship to the right, these were as tall as the breakwater itself. Tamiya mistakenly made these roughly half the height they should be. This can probably be remedied with styrene stock or aftermarket parts (Eduard's photo etch set includes these parts).
- Enclosed Focsle Deck (Former 5.5" Batteries - These are the open areas along the port and starboard sides of the model. On the real Hood, these were actually large open areas supported by pillars. On the Tamiya model, these are quite different: Tamiya chose to divide each side into three small compartments. The image to the right is a crude comparison of the kit and actual ship. This was likely an "economy measure" undertaken by Tamiya to keep the moulds and construction from being too complex plus to keep the price down. Needless to say, this is by far, the worst mistake in the model.
To completely fix this would require major surgery. The area would need to be cleared out and all new structures & detail added. This may be too much work for many modelers. Fortunately, this area is small and dark…so a “halfway” fix may be quite adequate: I would recommend that modelers at least remove the thing walls that divide each side into three compartments. Add some doors and portholes to the interior bulkheads, paint the deck teak coloured and add some supporting pillars. This will go a long way towards making the model look more accurate.
 Shelter Deck- This piece (part A43) is largely accurate. The hatches, vents and various lockers are laid out roughly in the proper locations. Unfortunately, there are a few that are oriented the wrong way, or are not in precise positions. Many items are also too basic in shape or otherwise slightly out of scale. This is understandable however due to the scale and moulding limitations. Most lockers are accounted for (I can recall at least one large ready use locker that is missing on the port side just forward of the Admiral’s Barge). As with the focsle, many details are a bit oversized, but again, this is due to the scale and moulding limitations. The only major error on this part is the shape of the splinter shield/bulwark surrounding the very rear/centerline twin 4” gun emplacement. We'll go into this in more detail in the Amidships/Aft Structures section below.
Quarter Deck- This is the stern deck. Its moulded into the hull. It is generally laid out correctly. Some of the vents are slightly mis-positioned, but are still sufficiently close. It is missing the rudder post plate and the stern anchor hawse pipe (Hood carried a stern anchor early in her career...but this was not present in 1941. Only the hawse pipe remained). Click here to see a photo of the fittings on the quarterdeck of the actual ship.
Armament/Guns
15" Main Gun Houses/Turrets - A few minor details aside, the four main 15" gun houses/turrets (parts B4, B5 and B6) are nicely done. These only need minor work at best.
- “B” Gun House Shape- First, please note that Hood’s gun houses (parts B6) were not all identical. The first (“A”), third (“X”) and fourth (“Y”) gun houses were essentially the same, but the second ( “B”) was shaped slightly differently. On the actual ship, this gun house had notched/angled edges on the rear of the gun house. The Tamiya kit does not replicate this. This can easily be addressed by carefully using a knife or file to remove the rear corners.
 Gun House Director “Wings” - Another issue to address concerns the director “wings” of each gun house (parts B5). The Tamiya kit directors are missing the centre sited. Additionally, the kit depicts the outermost ends of these as having notched/angled rear corners. In reality, only “A” had the notched/angled rear corners on it’s director. The other three gun house directors had identical squared corners. This may be addressed with putty, CA glue or plastic strip stock. Click here to see a photo of the "platforms" on the actual ship.
- Gun Barrels- The main gun barrels (parts B4) are okay, but I would still recommend replacing them with appropriate style brass barrels (if available). If not, take care to clean up the seams and drill holes in the muzzles of the plastic barrels. Regardless, it will be necessary to add blast bags (white glue, foil, putty, etc., are possibilities).
- "X" Gun House Platforms- These were not included in the kit I reviewed. One was shown on the line drawing/painting instructions though. I do not know if these were ever included in the Tamiya kit. At any rate, these need to be added. Be advised that these were not solid/flat platforms, but were open frameworks. They consisted of square segments with X cross beams in the centre of each square. Replace these with correct photo etch once it is available. To date, no photo etch manufacturer has gotten said parts right though. Click here to see a photo of the "platforms" on the actual ship.
- "Bridge" on Rear of "X" Gun House- In addition to the aforementioned platforms/frameworks, there was also a small "bridge"/platform permanently attached to the upper rear/centre of X gun house. This allowed access to/from the rear of the turret and the very end of the boat deck. This was in place for several years before the sinking.
- Vents on "B" and "X" Gun Houses- These gun houses each had a pair of slim vents that were attached to their rear bulkheads. Although it may be a tad out of scale, these can be replicated with very slim strip styrene.
Secondary/Anti-Aircraft Armament - The secondary armament, to be blunt, is not very good. It needs a great deal of work. Specific issues are listed below:
- Twin 4" Secondary Armament- These assemblies (parts B35 and B37) are crisply moulded, but lack detail. Additionally, the shape of the shields seem to be too low/squat. I suggest replacing them with photo etch or aftermarket replacement parts such as those in the Eduard photo etch or WEM 700 professional resin turrets. You could also replace them with parts from other models kit.
- Pom-pom Anti-Aircraft Guns- These assemblies (parts B23 and B24) are overly thick and bulky. These are best replaced by aftermarket resin or photo etch parts. Additionally, pom-poms from newer plastic kits might also work.
- UP Rocket Launchers- These items (parts B25) are incorrectly shaped and under-detailed. These should be replaced by aftermarket parts. There is also a small error in the circular UP splinter shield/bulwark atop "B" gun house. Tamiya failed to include two raised sections of shield to port and starboard of the UP launcher. Click here to view a photo showing the correct shape of the splinter shield.
- 0.5" Machine Guns- These items (parts B15) are overly thick and overly bulky. These should be replaced by aftermarket parts.
Forward Superstructure/Bridge
Generally speaking, the bridge decks appear to be acceptably close to the actual configuration aboard Hood. There are some minor issues regarding precise shapes and lack of detail. There are also some fit and finish concerns to be aware of. These are highlighted below:
 Conning Tower- Be advised that it is extremely easy to join the pieces (parts A34, A36 and A40) together incorrectly. It could result in some of the various view slits being slightly misaligned. As this is one of Hood’s key recognition features, great care should be exercised in getting this right. Additionally, there are some fit and finish issues when it comes to mating the conning tower assembly with the lower bridge base. Be sure to align the assemblies carefully and fill the gaps. It’s easy to accidentally catch a corner here and there, so be extra careful when sanding.
Bridge Base/Admirals Signal Platform - This is formed from various components (A30, A41, A42 and A47). My comments only apply to the deck portion. This is largely correct, but could use some detailing aft. Below, the sides of the bridge need to be extended aft. This is easily done with styrene strips/sheet. Once could also attempt to build the underside structures beneath the bridge if so inclined. Above, I suggest adding the four signal flag lockers at the very end (the items in blue in the photo to the right).
Admiral’s Bridge - The shape of this piece (part A37) is a bit “off”. It needs to be filled in and the forward splinter shield/bulwark extended. Additionally, you need to remove the small “bumps” present on this piece (these features were no longer on the ship by 1941). It’s also necessary to add in the rear screens. These various modifications should be relatively easy to address with a sharp knife, sandpaper and styrene strip stock. Click here to see a before and after photo of this piece. Please note that canvas covered railings were used on the Admiral's Bridge deck until very early in 1941 when metal splinter shields/bulwarks were added. So, if you are modelling Hood as sunk, you will need to add this shield using strip styrene. Don't add the canvas railings!
Compass Platform - Take care in aligning the large block-like areas immediately adjacent to this area (parts A29 and A35). They do not line up well. Be sure to fill the forward and side gaps and sand them smooth.
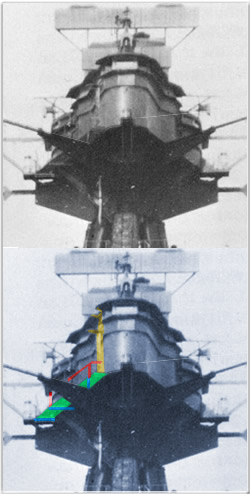
Spotting Top/Starfish/Foremast - This assembly (parts A10, A13, A14 and A15) is generally correct in configuration with the only notable exceptions being the actual "deck" portion of the starfish platform itself (part A10). The actual ship had a small platform on the forward starboard side. There were also large rounded rear "corners" (click here to see a rough diagram). This feature is shown in period photos of the ship as well as images of the wreck.
Rotating Radar Hood on Spotting Top - This was where the Type 284 gunnery radar was mounted. We’ve already covered the actual radar earlier in this article, but now we are addressing the structure the radar was attached to. Tamiya included a box on the rear of the Type 284 radar hood (part A16). There was actually no box there. There was actually a raised section of roof in the port/rear corner of the radar hood. Click here to view a rough schematic of the radar hood's configuration (minus radar).
Type 284 Radar- This item (part A12) is very under-detailed. We suggest replacing the radar elements with aftermarket photo etch. Be careful though- most photo etch depicts the Type 284 radar as "flat". In reality the Type 284 had a central antenna which was open at the front (with numerous vertical bars and covered by canvas) and more or less curved at the rear. This was attached to a framework at the sides (with hexagonal panels) and from behind (by bars). This framework was connected at the rear to vertical supports which were attached to the rotating hood below. Click here to see a photo of Type 284s aboard ships.
HACS Mk III* Directors- These items (parts B18 on the bridge and A6 for the aft director) are extremely incorrect. They appear to be simple "boxes on thin sticks". The actual directors were a bit more complex in shape. Recommend replacing them with aftermarket parts (if any are available) or otherwise scratch building something more accurate. Click here to see the correct shape and layout of the bridge HACS Mk III* directors and attached shelters.
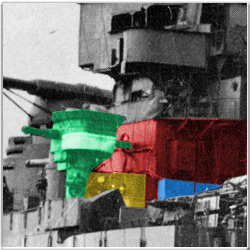 Signalmen's Shelters - These are missing from the Tamiya model. The photo to the right shows one of the shelters (in yellow). In 1940, narrow enclosures were built on this deck- one to port and one to starboard. They were situated between the HACS Mk III* pedestals (parts B18) and the side of the bridge... the rear parts of the Conning Tower Platform above this level (part A34). They were literally attached to the tube part of the HACS Mk III* mounts (green area in the photo to the right) and the lower sides of the Conning Tower Platform (red area in the photo to the right). These shelters were about the same width as the HACS Mk III* pedestal "tube". The shelters will go from the deck to just beneath the actual HACS (leave room for the HACS to rotate). There will be a small door in the shelter's rear very close to the HACS pedestal. These should be relatively easy to add for anyone so inclined.
Other Bridge Suggestions - As mentioned above, there are various detail issues with the bridge- mainly that it lacks adequate detail. It would greatly benefit from additional detailing such as through-deck ladder ways, styrene voice pipes or photo etch ladders, doors and rails (please note that canvas covered railings were generally used on the Admiral's Bridge deck). Additional details to consider adding are the navigation lights and cable trunking on the tripod legs.
Amidships/Aft Structures
Funnels - These assemblies (parts B7 through B12) are largely correct. I recommend hollowing out the tops (parts B12) and using photo etch cage tops. Do take care when gluing these to their bases as they are a loose fit. This will help avoid a skewed appearance when the model is assembled.
Large Engine Room Vents/Funnel Bases - These are poorly detailed (particularly the one beneath the first funnel). Suggest augmenting both with aftermarket photo etch.
 Disinfector House/Motorboat Workshop/Amidships Searchlight Platforms - This is the small building (parts A24 and A27) directly behind the second funnel and between the amidships searchlight platforms (parts B16). Tamiya arranged this to be a single rectangular building with three large windows. This is a major error. In reality it was a two tiered structure- a small building (with three large windows) atop a wider/deeper base structure. The correct shaped is shown in the image to the right. Tamiya also failed to make the searchlight platforms physically connect to the outer edges of the lower structure as they did on the actual ship. This is tricky to address, but it can be fixed with a knife, file, putty and plastic stock.
Mainmast - This assembly (parts A17, A18 and A21) is largely adequate, but suggest replacing the upper mast with brass rod and photo etch. This particularly applies to the Type 279M radar. We suggest replacing the main derrick pulleys and tackle plus the assembly with aftermarket photo etch. Also, it is advised to add the diesel exhaust pipe up the port rear tripod leg using wire or tube styrene. The access ladders and flag gaffs are also recommended additions (use photo etch and wire).
After Superstructure - This assembly (parts A3 and A5) is the structure that rises up directly behind the main mast (aft of the boats). There is a considerable lack of detail. Tamiya omitted the square, canvas-covered windows which were located near the bottom of the aft side. They also failed to create the large indented port/rear section of the structure (see the image below and to the right). The centre section of this entire structure is also not shaped correctly (it was oval) and there are no supports for the roof overhang. There are missing doors and portholes as well. Although it could be difficult, a talented modeler can remedy this.
 Pom-Pom Bandstand - The bandstand (part A7) is too tall. It’s base is also incorrectly shaped - it was not rounded, but was actually angular. Recommend removing base and replacing it with correctly configured based created with styrene strip stock. If this is too difficult, then it may be possible to cut down the existing base (to reduce its height) then clad it in styrene stock to approximate the correct shape. Be sure to add two splinter shields under the bandstand as well. One was under the forward "flat" end and one was under the port side of the bandstand. Both shields extended from the deck to the bottom of the bandstand.
Rear 4" Emplacement splinter shield/bulwark - On the kit, this is shown as a “U” shape. Recent photo discoveries have since proven that this area was configured slightly differently. At the front was an opening with short angled walls. These connected to rounded walls to port and starboard. At the very rear was a flat wall. This can probably be addressed through careful cutting, sanding and styrene strip stock. The image to the right indicates the correct shape.
Boats/Rafts
The ship's open row boats are decent for the scale, but the motorboats (parts B27 and B28) are very poor. They are extremely under-detailed (missing windows, etc.). It may be feasible to augment some boats with photo etch, or otherwise replace them with aftermarket parts. Please note that some legitimate shortcuts can also be taken- Hood's Admirals Barge, small motor boats and open row boats were usually canvas covered. This could save you some modelling time.
As for the Carley Floats/rafts (parts B33), recently discovered photos of Hood taken in spring 1941 (some showing her en route to fight Bismarck) indicate that the positions of her bridge-mounted Carley Floats had changed. For most of her wartime service Hood carried two rafts on each side just aft of the conning tower. In early 1941, this was changed: The top rafts were moved just a few meters aft, but the lower rafts were moved much farther aft and were slung alongside stacks of rafts atop the vents below the first funnel. So, do not glue the forward rafts where Tamiya indicates! Click here to view a 1941 photo showing you exactly where to mount the rafts.
Other Suggestions
Any 1/700 scale ship model can benefit from additional detailing. This model is certainly no exception. The following are some generic suggestions:
- Add through deck ladder ways (Tamiya virtually omitted all of these).
- Add voice tubes with thin wire or strip stock
- Replace mast yards, flag staffs, etc., with photo etch, wire or strip stock
- Add photo etch railings
- Don't over weather the ship when painting it! She was old and she was busy, but they did try to keep up appearances! See our article on the Paint Schemes of H.M.S. Hood, 1920-1941
Photos of Completed Kit
Shown here are various examples of completed Tamiya 1/700 scale Hoods. Additional examples can be seen in our Models Gallery.


Above- Two views of my first attempt at the Tamiya Hood...long before I had the proper painting instructions obviously! Note the incorrect shades of grey, excessive weathering, wrong rigging, incorrectly coloured blast bags, etc.
This model was destroyed long ago during a move. Oh well, it seemed nice at the time...
Below you'll find some much nicer examples of the kit. Even more examples are in our Hood Models Gallery.


Above/Left- Vincent Lau's Tamiya Hood ; Above/Right- Robert Swan's Tamiya Hood
Below/Left- Sami Arim's Tamiya Hood ; Below/RIght- Pat Roach's Tamiya Hood


Below- Paul Cadogan's 1/700 scale Tamiya Hood (left) and 1/700 scale Trumpeter Hood (right)

Kit Build
If anyone has built this kit and would like to share the experience, please let us know. We'll gladly add an article here.
Other Reviews (Alphabetically Sorted)
Aftermarket Parts (Alphabetically Sorted)
Eduard
1/700 H.M.S. Hood photo etch set : Very nice, but a bit dated (due to recent discoveries regarding the configuration of Hood). Its also a tad thick. Despite this, it offers many features not available in other photo etch sets.
Gold Medal Models
1/700 WW2 British Warship photo etch set: A nice assortment of detailed photo etch parts for various 1/700 scale Royal Navy capital ships, to include Hood. Includes railing, radar, yardarms, crane/derrick rigging, funnel cap grilles, boat rigging and oars, ladders and more. Unfortunately, it doesn't quite have everything the 1941 Hood needs (for example, a correct degaussing cable - something this model needs). Its good for the 1931 Hood though.
Snyder and Short Enterprises
Royal Navy Paint Chip Set 1: A superb set of paint chips which will cover the colours worn by Hood (as well as most other Royal Navy vessels) during her career. These will allow you to mix your own favourite paints.
White Ensign Models
WW2 Royal Navy Anti-aircraft Weapons (WEM PE 720 1/700 Scale): 2 x 8-Barreled Pom-Poms, 2 x 4-Barrelled Pom-Poms, 3 x 0.5" machine guns...multi-part designs in relief-etched 3 thou brass. Very nice and should work well with any 1/700 model of Hood.
1/700 H.M.S. Hood (WEM PE 722 1/700 Scale): This is now very dated and has a few notable erroneous parts. Most notable of these is the forward starfish. The deck portion is dead wrong. The degaussing cable is also not as close as it could be. The gunnery radar is also likely to be off. Fortunately, most of the rest of this set is still accurate and should work well with the model. Includes: Guard Rails, 0.5" Quad machine guns, 8 barrel Pom-Poms, Spotting Top starfish assembly, Anchors, Life buoy Racks, Mainmast rigging, Jack and Ensign Staffs, Main boat boom tackle, various davits, Semaphores, Various ladders, 284 and gunnery radar, Main director arm stays, Stern boarding pole, Searchlight lens cruciforms, Type 279 radar assembly, Spotting top yardarms, Funnel Cap grilles, Foredeck ladders, Wireless House Aerial Spreaders, Mainmast Starfish Assembly, Funnel Housing Vent grilles, Spotting top Station lights and Aerial Spreader, Degaussing Cables, Anchor Cables, Boarding Ladders, Vertical and Inclined Ladders doors hatches and more.
White Ensign "700 Professional": Plastic 8 barrel pom-poms and UP launchers. These will work well with any 1/700 model of Hood as sunk.
White Ensign Models Colourcoats: This is perfect for people who don't want to mix their own paint. These contain exact paint matches for Hood's known paint schemes (first see our Paint Schemes article to determine which paints you will need though).
If you know of detailing parts we have overlooked, please let us know.