I. Interior Photos
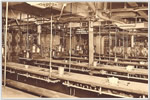
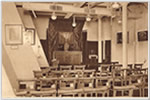
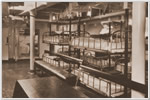
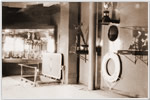
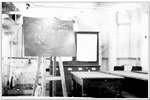
1920s Interiors
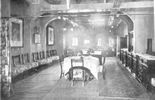
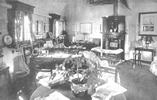
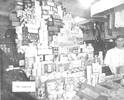

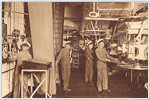
Above (left to right): Admiral's Dining Room, Admiral's Sitting Room, NAAFI Canteen, and the Conning Tower
These photos were taken during the Empire Cruise of 1924. This were formerly in the collection of Commander Dudding and are now in the collection of our own Paul Bevand.
These areas are not believed to have changed very much between 1924 and the end. Click each to enlarge.
1930s Interiors


Above (top row, left to right): An Engine Room, A Seaman's Mess, the Chapel & the Sick Berth/ (Bottom Row, left to right): Lobby outside the Commander's quarters, Admiral's Dining Room, Gun Room & the School Room.
The first four photos were taken by the firm of Wright and Logan in 1931. Copies were sold aboard the ship in the bookstall (NAAFI Canteen). We received these variants through the collections of various veterans and crew families. The next two photos are from the personal collection of Commander Rory O'Conor. They are used here through the courtesy of his daughter, Nixie Taverner. The next photo is from the personal collection of Commander Keith Evans. He took this photo aboard Hood sometime during 1938. The last photo is in our Association archives. It is unlikely that these areas changed drastically between the time the photos were taken and Hood's loss. Click each to enlarge.
Wartime Interiors
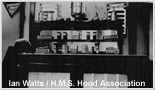
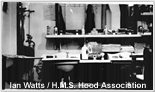
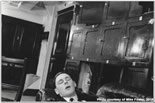
Above (top row, left to right): Two views of the barber shop. / (bottom row): the Gun Room)
Wartime photos of Hood's interior are quite rare. The top two photos were taken by crewman James Harris in 1940 or 1941. Sadly, James was later lost in the sinking of Hood. Photos courtesy of Mr Ian Watts. The bottom photo was from the collection of veteran Roy Foster. It shows a Midshipman Mackenzie in Hood's gun room (Midshipman's area). This photo is courtesy of Roy's son, Mike Foster. Click each to enlarge.
II. Exterior Photos
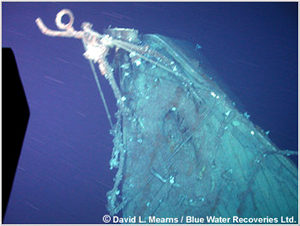
The Wreck of Hood, July 2001
Shown here is the stern of Hood. The wreck of Hood was discovered and explored by David Mearns and a team of professionals working on behalf of Channel 4 in 2001. This photo is courtesy of David L. Mearns and Blue Water Recoveries Ltd.
We have in-depth coverage of Hood's wreck (and Bismarck's wreck) which can be accessed by clicking here.
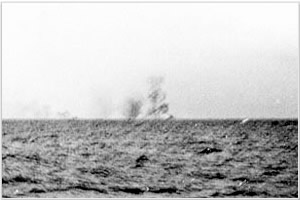
Hood's Loss, 24 May 1941
This photo was taken by Kriegesmarine war photographer from onboard the heavy cruiser Prinz Eugen. It is reputed to show the immediate aftermath of the explosion which sank Hood. The battleship Prince of Wales is to the left of the smoke column. Hood is obscured by the smoke. This is the only known image showing the explosion.
This instance of this very well known photo is from our Association's archives.
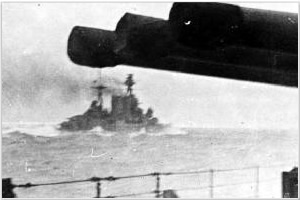
Hood the Day Before Her Loss, 23 May 1941
This photo was taken by a crewman aboard H.M.S. Prince of Wales on 23 May 1941. It shows Hood leading the squadron in an attempt to intercept Bismarck. This is one of the last known photos of Hood before she was lost the following morning.
This instance of this very well known photo is from our Association's archives.
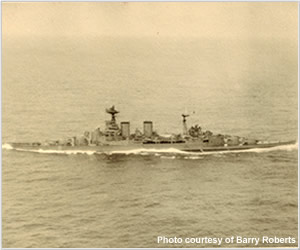
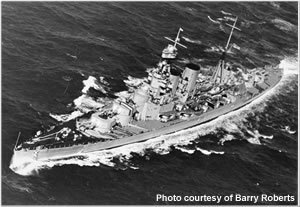
Hood Enroute to Meet Bismarck, May 1941
This photo was taken by an aircraft and shows Hood southwest of the Faeroe Islands on the afternoon of 22 May 1941. She is on the ill-fated sortie to engage Bismarck. This is one of the two last clear photos taken of Hood. This photo is courtesy of our Liaison Officer, Barry Roberts.
Click on image to enlarge it.
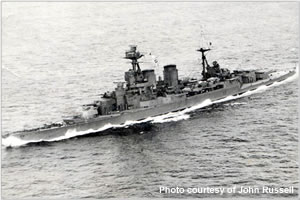
Hood South of Iceland, 05 May 1941
This photo shows Hood en route to Scapa Flow from Iceland. Her position is listed as 61 50N 16 08W (roughly 135 miles south of Iceland and 330 miles west of the Faeroes). The ship is shown here in her final configuration. She is wearing a temporary medium and dark grey paint scheme, but otherwise, she is more or less exactly how she would appear during her battle with Bismarck less than three weeks later. This excellent photo is courtesy of Mr. John Russell.
Click on image to enlarge it.
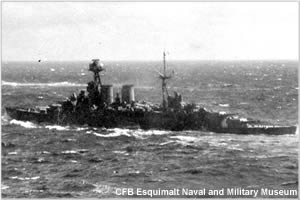
Hood in Atlantic, April 1941
This photo shows Hood on patrol in the Atlantic during April 1941. She is in her final configuration and looks more-or-less exactly the same as she would during her catastrophic engagement with Bismarck a month later. This photo is courtesy of the Canadian Forces Base Esqimalt Naval and Military Museum.
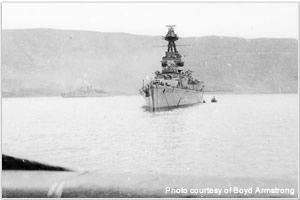
Hood Anchored off Iceland, April 1941
This photo shows Hood anchored off Iceland in April 1941. She is shown here wearing a temporary medium and dark grey paint scheme, but is otherwise in her final as-sunk configuration. This was provided to us by Boyd Armstrong. It was formerly in the collection of his father, who served in the Canadian 14th Brigade and had many friends who served overseas. This photo may have been sent back to him.
Click on image to enlarge it.
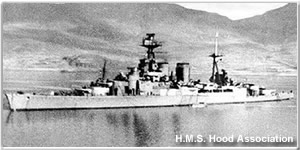
Hood off Iceland, April 1941
This photo shows Hood off Iceland during April 1941. She is shown here in her final configuration but wearing a temporary medium and dark grey paint scheme. It is part of the H.M.S. Hood Association archives having been sent over from a member in Canada some years ago.
Click on image to enlarge it.
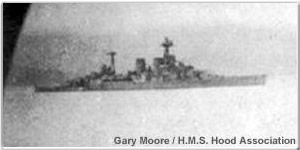
Hood at Iceland, April 1941
This photo shows Hood off Iceland during April/May 1941. She is seen in in a temporary medium and dark grey paint scheme that was worn during 1941 up to about two weeks before her sinking. Special thanks to Gary Moore for allowing us to use it here.
Click on image to enlarge it.
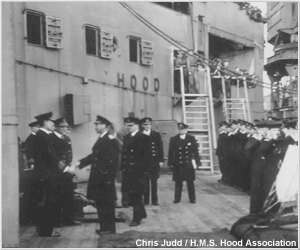
His Majesty King George VI Aboard Hood, 06 March 1941
This photo shows The King during his final inspection of H.M.S. Hood. She was in Rosyth, undergoing a minor refit. In this photo, he is greeting an officer, who is most likely Captain Ralph Kerr.
This is from the personal collection of crewman Jack Silk, who was later lost in the sinking of Hood. The photo was donated to the website by Chris Judd.
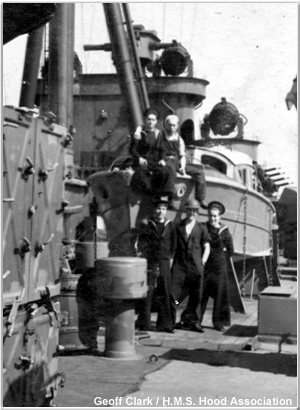
Hood's Boat Deck, Late 1940/Early1941
This photo shows crewmen gathered around one of the 35 ft fast motor boats. This is a rare view of one of these boats actually aboard the ship. Said boats were installed aboard Hood in the months before her loss.
Also visible here is the port rear quad 0.5" machine gun, searchlights and the HACS Mk IIII* director for "Aunty" pom-pom.
This is courtesy of Geoff Clark and originally comes from the collection of crewman Norman Hartley. Norman was later lost in the sinking of Hood.
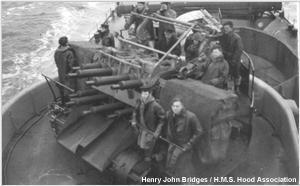
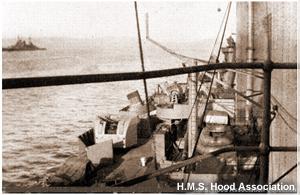
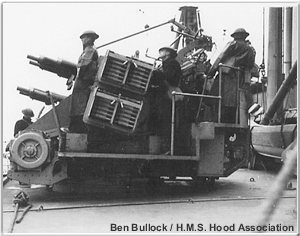
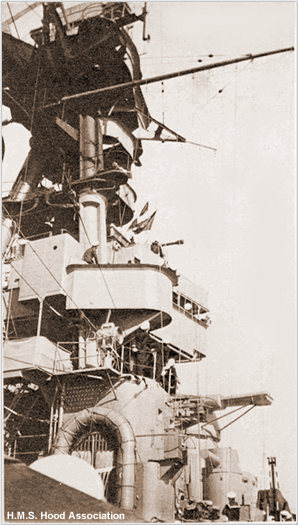
"Aunty" (Rear Pom-Pom), Late 1940/Early1941
This crew of the aft pom-pom mount (aka "Aunty") appear to be engaged in a gunnery drill. Below & behind them, is the aft 4" gun mount and its splinter shielding. This photo proves the layout of the very end of Hood's shelter deck was notably different than any plans have shown.
This is an extremely rare view of this area. This originally comes from the collection of crewman Ken Bridges (in the front on the right, wearing a long coat). Ken was later lost in the sinking of Hood.
Hood, Early 1941
This photo shows the starboard shelter deck abreast the first funnel. In this shot one can see various anti-aircraft armament, rafts, splinter shielding and other equipment. Hood is believed to be on one of her early 1941 patrols. This is from the H.M.S. Hood Association archives.
Click on image to enlarge it.
Colour Footage of Hood in 1940
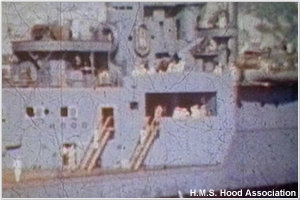
This is a frame from one of the very few colour films of Hood known to exist. The configuration and colour of the ship would indicate that this was taken in mid-late 1940. She appears to be in Mediterranean waters. She looks very similar (but not entirely identical) to the way she did when she sank.
Shown here are the after superstructure, "Aunty" pom-pom bandstand and the forward portion of the quarterdeck.

Hood in Colour, Summer 1940
This is a frame from a rare colour film of Hood. Based on her colour, configuration and crew dress, she appears to be in Mediterranean waters in mid 1940. This footage was heavily retouched which resulted in the ship taking on a lighter (and bluer) appearance. In reality, she was a darker grey.
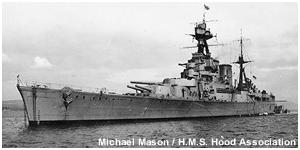
Hood at Scapa Flow, Late 1940
This photo was given to the Hood Association by Michael Mason. It was formerly in a collection of photos owned by Vernon Mason, who was lost in the sinking of Hood. She still has her top mast and has yet to receive her radars (these would be added in early 1941).
Click on image to enlarge it.
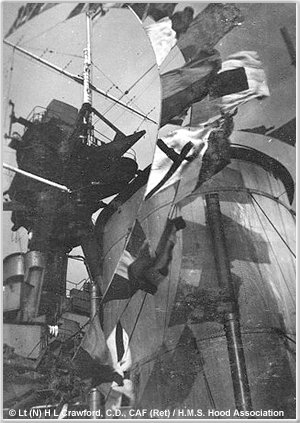
Flags Flying Aboard Hood, 1940
This photo is from the Crawford Photo Collection. It was sent in by Lt (N) H L Crawford, C.D., CAF (Ret). It was originally acquired by his brother Bill Crawford. Bill was later lost in the sinking of Hood.
"Sammy" (Starboard Pom-Pom), Late 1939/Early 1940
This aftwards view shows Hood's starboard pom-pom, known to its crew as "Sammy". This photo was sent in by Ben Bullock. It was from the collection of his brother, Edward Bullock, who was lost in the sinking of Hood.
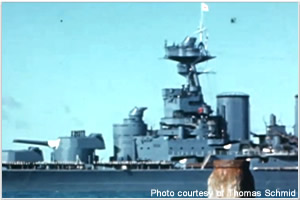
Colour Footage of Hood off Southsea, August 1939
This photo shows Hood off Southsea, Portsmouth, UK in 1939. She was undergoing trials following a series of upgrades carried out at Portsmouth Naval Base. This is from a rare colour film shot by her Chief Engineer. This photo was provided by Thomas Schmid.
The film can be viewed online at The National Museum of the Royal Navy's website.
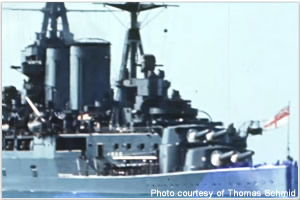
Hood in Colour, off Southsea, August 1939
This photo shows Hood off Southsea, Portsmouth, UK following her 1939 upgrade. She had recently completed a dockyard visit at Portsmouth Naval Base. The film was originally taken by her Chief Engineer. This photo was provided by Thomas Schmid.
The film can be viewed online at The National Museum of the Royal Navy's website.
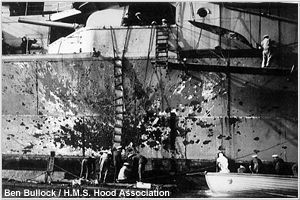
Battle Damage, September 1939
On 26 September 1939, Hood suffered damage from a German 500lb bomb. The bomb glanced off the port side of her hull abreast the forward funnel, then detonated nearby in the sea. This photo shows the minor external damage experienced. This photo was sent in by Ben Bullock. It was from the collection of his brother, Edward Bullock, who was lost in the sinking of Hood.
Click on image to enlarge it.
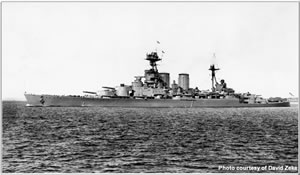
Hood off Southsea, August 1939
This photo shows Hood off Southsea, Portsmouth, UK in August 1939. The ship was undergoing various upgrades at nearby Portsmouth Naval Base that summer. The tip of Gosport can be seen in the background tp the right. This photo was sent in by David Zeke.
Click on image to enlarge it.
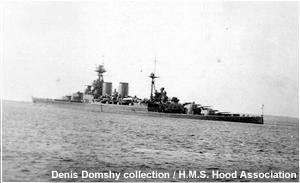
Hood off Southsea, August 1939
This photo shows Hood passing Southsea, Portsmouth, UK. It was very likely taken on the same day as the photo above in roughly the same vicinity (though a tad later). In the background to the right of the ship is the Isle of Wight. This photo was sent in by Denis Domshy. The photo was taken by his mother in-law, Edna Rushton, on 10 August 1939...her 21st birthday. She took the photo with her birthday present, a new camera.
Click on image to enlarge it.
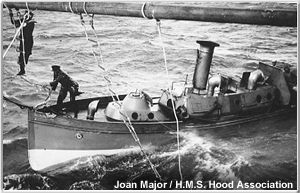
50 foot Steam Pinnace, 1939/1940
This photo shows one of Hood's 50 foot steam pinnaces mooring to one of the large amidships booms. These boats were removed from Hood in 1940. This photo was sent to us by Joan Major. It was formerly in a collection of photos owned by Edward Strange who was lost in the sinking of Hood.
Click on image to enlarge it.
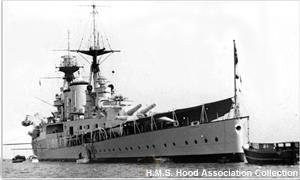
Hood Visiting France, 1938
This photo shows Hood during a visit to France (believed to be Toulon, but we are currently unable to verify this). Based on the configuration of the ship, this would be sometime in early 1938. This is from a card in the H.M.S. Hood Association collection.
Click on image to enlarge it.

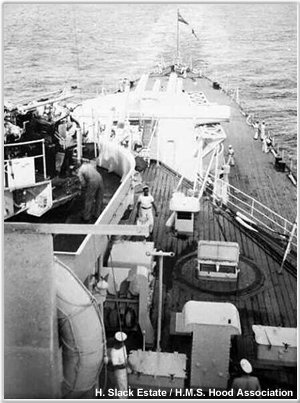
Hood's "Boat Deck", 1937/1938
This photo shows Hood's Shelter Deck (also known as the "Boat Deck"). This photo was taken from the rear of the spotting top. It shows Hood as she appeared in late 1937 or early 1938. At that time, she was assigned to the Mediterranean Fleet.
This photo is from the personal collection of former Hood crewman Melville Percival.
"Aunty" Pom-Pom, 1937/1938
This photo shows the fairly recently installed aft pom-pom (known as "Aunty") and its bandstand. The ship is serving with the Mediterranean Fleet at this point in time. This photo comes from the Howard Slack photo collection.
This photo was likely taken by the ship's photographer and sold in her bookstall. We base this on the fact that we've seen a number of examples of this photo in various sailors' collections.
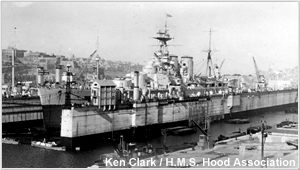
Hood in Drydock at Malta, Late 1937
This photo is of Hood during either her September or November refit at Malta in 1937. It is from the collection of H.M.S. Hood Association Treasurer, Ken "Nobby" Clark.
Click on image to enlarge it.
Hood at Sea, 1937
Hood is shown here at sea during one of her Spanish Civil War neutrality patrols. Note the extremely wet focsle. This is courtesy of Barry Roberts.
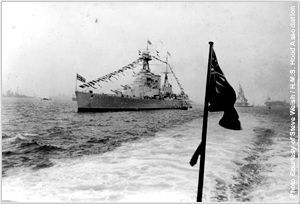
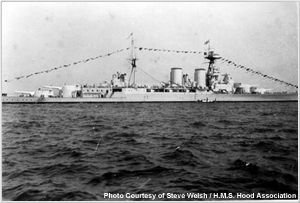
Hood at the Spithead Naval Review, May 1937
This photo shows Hood off Spithead for the Naval Review in honour of His Majesty, King George VI's Coronation. She is shown (along with what appears to be IJNS Ashigara to the left) 'dressed' in flags. Photo courtesy of Mr Steve Welsh.
Click on image to enlarge it.
Hood at the Spithead Naval Review, May 1937
This photo showsHoodoff Spithead for the Naval Review in honour of His Majesty, King George VI's Coronation. She is shown 'dressed' in flags. Photo courtesy of Mr Steve Welsh.
Click on image to enlarge it.
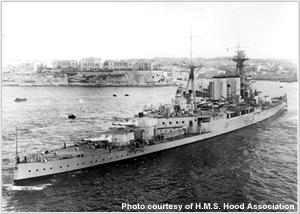
Hood Prior to Her 1937/1938 Refit
This showsHoodentering Grand Harbour, Malta shortly before the refit that saw the armoured torpedo director station replaced with a pom pom bandstand, and the after superstructure expanded.
Click on image to enlarge it.

Hood at Valetta Harbour, 1937
This photo was taken from the fortress at Valetta Harbour. Hoodcan be seen in the background. This photo came from the collection of Naval Liaison Officer Lt. Commander A.F. Burke who visited the area numerous times between 1939 to 1941. This photo is courtesy of Terry Burke.
Click on image to enlarge it.
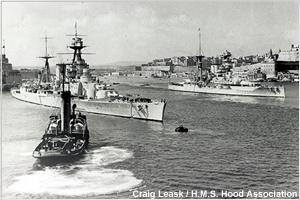
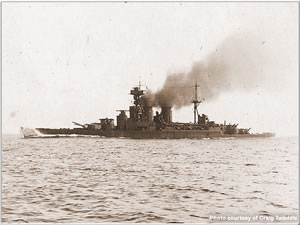
Hood and Barham, 1937
This photo showsHoodand the battleship Barham at anchor in Grand Harbour, Malta. We believe this was taken in 1937 prior to her refit. This photo is courtesy of Craig Leask.
Click on image to enlarge it.
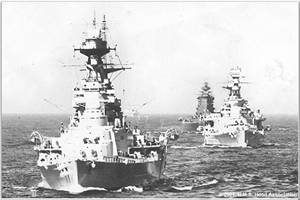
Hood, Circa 1936
This photo shows Hood leading H.M.S. Repulse and H.M.S. Nelson in the Mediterranean. This is from the H.M.S. Hood Association archives.
Click on image to enlarge it.
Hood, 1936
This photo shows Hood in her AP507C paint scheme indicating this is when she was assigned to the Mediterranean Fleet, but before she wore her aerial recognition markings on her front turrets. This would date this photo to roughly October 1936. This is from the H.M.S. Hood Association archives.
Click on image to enlarge it.
Hood, 1936
This photo shows Hood in her AP507C paint scheme, during a practice firing. This is from the H.M.S. Hood Association archives.
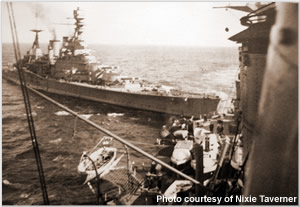
Renown Collides With Hood, January 1935
On 23 January 1935, the battle cruiser Renown collided with Hood during manoeuvres. This photo shows the moment just after impact. This is from a scrapbook of photos retained by then Commander Rory O'Conor. This photo is courtesy of the Royal Navy Museum Library and Nixie Taverner.
Click on image to enlarge it.
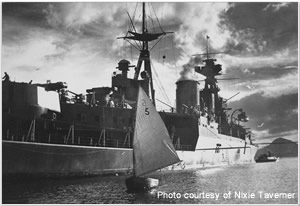
Hood at Gibraltar, Early 1934
Hood and most likely Renown are shown shown here at anchor at Gibraltar. Both vessels are present for the annual Spring Cruise to Spain and Mediterranean. This is from a scrapbook of photos retained by then Commander Rory O'Conor. This photo is courtesy of the Royal Navy Museum Library and Rory's daughter, Nixie Taverner.
Click on image to enlarge it.
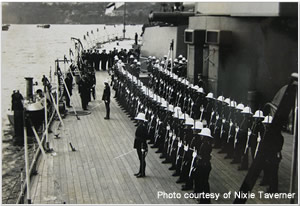
Hood at Madeira, January 1934
Hood's Royal Marines are shown welcoming the President of Madeira during his visit to the ship in January 1934. Hoodwas in the area participating in the annual Spring Cruise to Spain and Mediterranean (Click here to view map). This is from a scrapbook of photos retained by then Commander Rory O'Conor. This photo is courtesy of the Royal Navy Museum Library and Rory's daughter, Nixie Taverner.
Click on image to enlarge it.
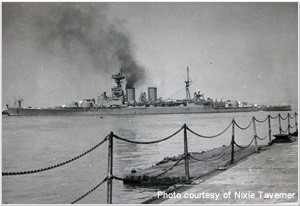
Hood at North Berwick, October 1933
Hood is shown here at anchor off North Berwick, Scotland. The weather was reputedly quite rough during this visit. This is from a scrapbook of photos retained by then Commander Rory O'Conor. This photo is courtesy of the Royal Navy Museum Library and Rory's daughter, Nixie Taverner.
Click on image to enlarge it.
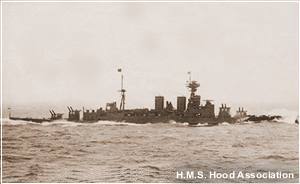
Hood Departing Portsmouth, September 1933
Hood is shown here enroute to Rosyth. She had recently been recommissioned and was taking her first voyage under the command of Captain Tommy Tower. This is from a scrapbook of photos retained by then Commander Rory O'Conor. This photo is courtesy of the Royal Navy Museum Library and Rory's daughter, Nixie Taverner.
Click on image to enlarge it.
Hood on Manoeuvres, 1930s
This photo shows Hood in the Mediterranean during one of the Spring or Summer cruises taken in the early 1930s. This is from the H.M.S. Hood Association archives.
Click on image to enlarge it.

Hood Framed in Light, November 1935
This is a night photo of Hood at Gibraltar on 06 Nov 1935. She was framed in light to celebrate the wedding of the Duke of Gloucester. This is from the collection of crewman Edward Strange wno was lost in the sinking of the ship. This was sent in by Joan Major.
Click on image to enlarge it.
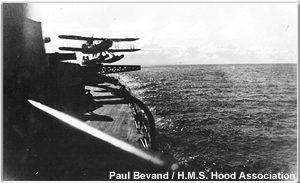
Seaplane Launch, 1931/1932
Hood's Fairey IIIF seaplane is launched from the quarterdeck catapult. This is courtesy of our own Paul Bevand.
Click on image to enlarge it.
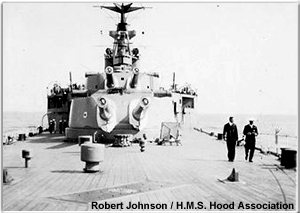
Quarterdeck, mid 1930s
The Quarterdeck in the mid 1930s. From the collection of RA Barber.
Click on image to enlarge it.
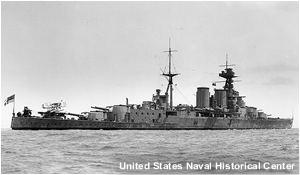
Hood with Seaplane, 1931/1932
Hood circa 1931/1932. Note the Fairey IIIF seaplane on her quarterdeck catapult. This proved to be a very unreliable arrangement and was ultimately removed. This particular photo is courtesy of the US Naval Historical Center. Visit their website to see more of their excellent Hoodcollection.
Click on image to enlarge it.
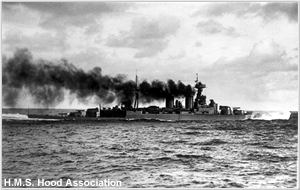
Hood Steaming at High Speed, Oct 1928
This photo shows Hood steaming at just short of top speed in early October 1928. This is from the H.M.S. Hood Association archives.
Click on image to enlarge it.
Hood at Speed, June 1927
This photo shows Hood in Scottish waters on 1 June 1927. She was carrying out a speed trial. This photo was sent in by long time Association member Craig Twaddle.
Click on image to enlarge it.
Hood Prior to Her 1929-1931 Refit
This shows Hood at some point during the 1920s.
Click on image to enlarge it.
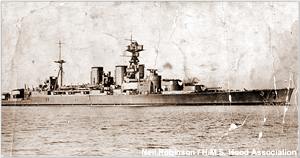
Hood During 1920s
This shows Hood at some point before her 1929-1931 refit. This photo is courtesy of Neil Robinson.
Click on image to enlarge it.
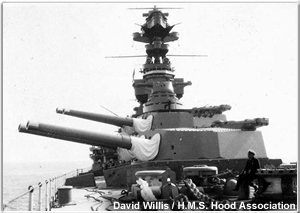
Forward Turrets, late 1920s
This shows Hood's "teeth" trained to starboard. This is from the Willis Photo collection.
Click on image to enlarge it.
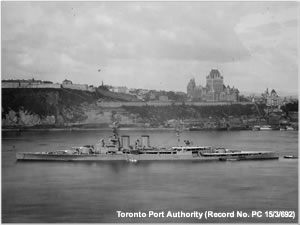
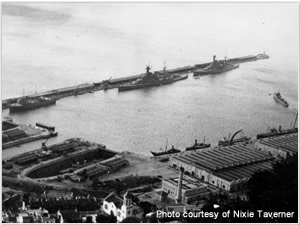
H.M.S. Hood at Québec, Canada, August 1924
This photo shows Hood anchored in the St Lawrence River at Québec. The city's Chateau Frontenac Hotel can be seen in the background. This photo was sent to us by Jeff Hubbell of the Toronto Port Authority (the photo is listed in their holdings as record number PC 15/3/692).
Click on image to enlarge it.

"Stars & Stripes" Flown From Hood, 1924
This photo is of Hood in San Francisco, California, USA during the Empire Cruise of 1924. This was provided by Steve Wiper of Classic Warships. He obtained it from the collection of the U.S. Naval Historical Center.
Click on image to enlarge it.

H.M.S. Hood En Route to Gibraltar, November 1922
This reverse of this photos reads "Worlds largest battleship HMS Hood 44,400 TONS. Under steam trials from Las Palmas Canary Islands to Gib Nov 1922. Taken from HMS Repulse."
This was provided by Graham Moxey.
Click on image to enlarge it.

Hood, 1920
This photo shows Hood sometime during 1920. It was in the collection of Ernest William Riley who served in her first crew. This was provided by Alan C. Riley.
Click on image to enlarge it.
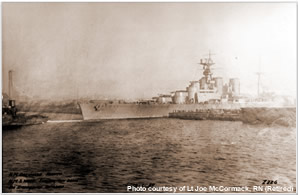
Hood at Rosyth, January 1920
This photo shows Hood reversing into the main basin at Rosyth on 19 January 1920. This is several months before she was commissioned. At this point in time, she is still being outfitted...note that she lacks her upper gunnery director. This was provided by Lt Joe McCormack, RN (ret'd).
Click on image to enlarge it.
More photos of Hood are in our Photo Collections pages as well as throughout our site.