
Box art for the Trumpeter/Pit Road kit
Background
Although there is a higher demand for models of Hood "as sunk", many modellers are still quite interested in modelling the ship as she appeared in her "heyday" of the 1920s and/or 1930s. Of the models representing the ship during this part of her career, the best was undoubtedly the Testors/Italeri 1/720 scale Hood. This was (and is) a good representation of the ship as she appeared in about 1933 (after her 2 year overhaul and after her aircraft gear was removed). The kit was not without it's problems- an oddly stipled hull surface, sometimes excessively thick mouldings and an "oddball"
1/720 scale being the primary issues of concern.
Trumpeter and Pit Road decided that the time was right to create a new early 1930s model of Hood, but in the more standard/accepted scale of 1/700. Using various plans as well as their 1/350 and 1/700 scale 1941 Hood models as guides, their engineers created the new 1/700 scale 1931 variant. Unlike their other two models unfortunately, they did not to consult experts until after the model moulds were practically complete.
To that end, Trumpeter sent me a sample pressing of the kit in July 2007. I reviewed the parts as best I could (there were no assembly instructions) and provided my inputs to Trumpeter immediately thereafter. Trumpeter acknowledged my inputs, but also told me that the kit was extremely advanced in the production process by that point. As a result, they were unable to incorporate all suggested changes (but they did incorporate some).
The kit, in it's Pit Road form, initially reached consumers in Asia in November 2007 and the rest of the world in March 2008. Please check with a local or online hobby retailer of your choice for latest prices and availability.
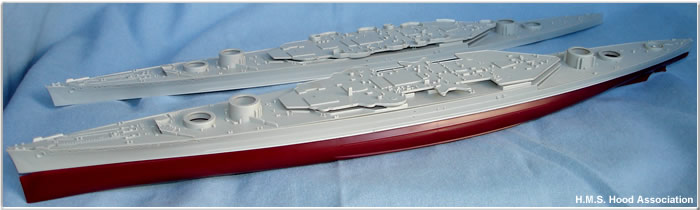
Above- The Trumpeter/Pit Road 1/700 scale 1931 Hood (foreground) and 1941 Hood (background)
Moulding & Detail
The kit consists of over 400 parts with the option of building the model in either waterline or full hull format. The parts above the waterline are in grey and the parts below are in red. There are 8 sprues, 4 large deck segments, upper hull, lower hull and waterline plate. Also included were detailed instructions, colour painting guidelines, black plastic mounting base, name plate and decals.
Based on my examination of the contents, the mouldings are mostly crisp and not terribly thick for the most part. There is a small amount of flash (excess plastic) on a number of parts, but this can be easily removed. I should also note that certain features of the kit are a bit "fiddly" or complicated, but nothing that can't be addressed by simply following instructions and dry-fitting in advance.
Overall Impression
This is the best kit of Hood as she appeared in 1931. This kit edges out the earlier Italeri kit in virtue of its superior detail and more finely-mouleded parts. The only drawback is the complexity of some of the structures. If you want an early model of Hood, this one is well worth it...and can be modifed (with careful research and creative modelling) into other early variants of Hood.
Notable errors and new discoveries are covered below. Also included are some suggestions on how to correct or improve the kit. Also note that this kit shares many of the same features as the 1/700 1941 Trumpeter/Pit Road Hood. As a result, those of you who've read our 1/700 1941 Trumpeter/Pit Road Hood review will note a great deal of similarity and repetition in some of the descriptions contained herein.
Corrections & Suggestions for Improvement
Upper Hull
 The hull appears to be correct in shape and size. Trumpeter wisely chose to avoid including too much plating detail, as this would have been well over scale. They did include are very nicely depicted main armour belt though. The torpedo mantlet details are good. The hawse pipes also look quite good (though they would look better if drilled-out and mated to the hawse pipe openings in the focsle deck as well).
Unfortunately, there is one serious error to mention however- Trumpeter/Pit Road moulded degaussing cable fairings above the bow hawsepipes. The photo to the right shows the fairings (items in red). These stepped fairings were not fitted to Hood until 1940. This would be a correct feature on their 1941 model, but not the 1931. Clearly, Trumpeter/Pit Road are using the same exact hull in both of it's 1/700 Hood kits. Needless to say, these fairings absolutely must be removed. Fortunately this is extremely easy to fix through careful cutting and filing/sanding.
Another major issue noted was that the sides of the hull (where one inserts the deck pieces) are overly thick. This is especially noticeable in the area of the bow/focsle. This, unfortunately, affects the focsle deck. More on this below.
Decks
 Forecastle (Fore Deck)- This part, shown in the image to the right (click to enlarge), is a bit too narrow due to the excessive hull sides thickness. Because of this, the starboard sheet anchor hawse pipe (the second/rear on on the starboard side) has been squeezed too small. In reality, it was identical in size to the other two focsle deck hawse pipes. Most modellers can overlook this, but those desiring total accuracy will have to enlarge the opening accordingly.
It may be possible to carefully drill and file the opening after gluing the deck piece to the hull (the drilling/filing will have to reach slightly into the inner edge of the hull in order to make the hawse pipe opening the correct size). In fact, I recommend drilling out all the hawsepipes (but keep the forward two the same size they currently are). As always, it would be wise to add/augment additional detail using aftermarket photoetch parts (i.e., anchor cables and hatches).
Enclosed Forecastle Deck (Center Deck)- This is the large lower centre deck piece. It's quite accurate overall. It's a tad narrow at the very front due to the extreme hull thickness, but this is acceptable. Additionally, some of the small mushroom vents (and possibly some winches) are slightly out of place or missing in the area around "A" barbette. This of course is hardly noticeable and can probably be left as is. It has one key error that must be addressed- it is missing some tall upright vents from the front of "B" barbette. These should be added using styrene strip stock.
 Shelter Deck (UP Deck)- This part is nicely done. Some of the small upright vents are a tad out of scale, but this is understanadable due to the scale and moulding limitations though. They are acceptable as-is. In my opinion, the only things that really "bother" me are the forward expansion joint and the "lip" that runs around the entire piece. While it is true that Hood did indeed have such a lip/gutter, it would be almost invisible at this scale. Photoetch railings generally take care of this feature. As for the expansion joint, it should have been engraved. These are both clearly nitpicky issues though. Most people probably won't even notice these items.
Quarterdeck (Rear Deck)- This part (seen in the photo to the right) is nicely done. One hatchway needs to be added near the forward-starboard side of "X" barbette. Once could also possibly add some tiny upright vents that appear to be missing around "Y" barbette. If so desired, photoetch can be used to enhance hatches and skylights. The rear hawse pipe can also be drilled out. The aircraft gear is nicely moulded into the quarterdeck piece (see photo to the right), although I had hoped it would have been a sub assembly to be glued to the deck (thus making it easier for modellers to modify the kit into other variants of Hood).
Armament/Guns
 15" Main Gun Houses/Turrets- The four main gun houses (Parts C5 for turrets "A", "X" & "Y"; Part C8 for turret "B") are much better than Trumpeter's notorious 1/350 scale Hood turrets. As the photo to the right illustrates, they are still a bit too angular in appearance, but this can be corrected through careful sanding/shaping. Trumpeter/Pit Road provided the option of barrels with or without blast bags. Thisis a particularly nice touch.
- Vents on "B" and "X" Gun Houses- These gun houses each had a pair of slim vents that were attached to their rear bulkheads. Although it may be a tad out of scale, these can be replicated with very slim strip styrene.
5.5" Secondary Armament- These ten mounts (these are made by assembling parts E1 & E2), are largely correct in shape and size. Due to the scale and moulding limitations however, some components are a bit thick. This should be quite acceptable for most modellers though. Aftermarket parts may be useful for those desiring extreme detail. Of course, short cuts are also available here- on the actual ship it was common for the rear openings of these gun shields to have canvas covers. This may be a way to avoid detailing but keep things accurate.
Single Barrel 4" Anti-Aircraft Guns- These mounts (Part E12) are largely correct. As with any small component, they are moulded a tad thick, but this should be acceptable for most modellers. Anyone desiring crisper parts should consider using aftermarket replacement parts or scratchbuilding the guns.
Pom-pom Anti-Aircraft Guns- The two pom-poms (C43, C44 & C45) are nicely done. They are a bit thickly moulded, but again, this is to be expected at this scale. They can, if wished, be made more accurate with or even replaced by aftermarket replacement parts. Most modellers however, should find the kit guns acceptable.
Forward Superstructure/Bridge
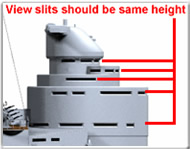 Conning Tower- The view port slits are not entirely correct. On the actual ship, these were the same height. Unfortunately, they are not the same height on this model. One row in particular is too tall- the ones created by adding part B51 to part J29. This could be difficult to fix. The average modeller can probably get away with ignoring it, but those desiring accuracy should consider making the necessary changes.
When finishing the Conning Tower, please take care to fill the larger seams. This is one of Hood's most notable features, so great attention to detail should be paid towards modelling it correctly. It should be quite smooth and should line up exactly. Take great care in assembling it and filling gaps where necessary.
Bridge Decks- These are largely correct. If so desired, one can add additional detailing such as styrene voice pipes. It's also advisiable to replace any plastic kit ladder with photoetch ladders. Additionally, suggest using photoetch doors and rails. Additional details to consider adding are the navigation lights, semaphores, cable trunking on the tripod legs, etc.
Admirals Signal Platform Base- This refers to the outer rear lower portions that hold up the deck. Parts A16 & A18 form together to make the portside rear base. Parts A17 & A19 form the starboard rear base. Parts A16 & A17 are both missing small outcroppings. These can be easily added with styrene stock.
 Bridge Base- This is formed from primarily from parts A21 & A26. This is generally accurate, but needs some slight modifications. First, remove the three horizontal booms moulded into each side. These were not carried until later in Hood's career. The torpedo lookouts near the front edges should also be removed. Also we've learned that the kit's instructions tell modellers to mount two rafts to each side of the bridge. Do not mount them here...they were not carried here in 1931. The mounting holes will need to be filled-in.
Admirals Bridge- This is correct in overall layout, but windows are missing from the rear screens (H14 and H20). These can be created with styrene. One other problem are the windows at the bottom of part B9. The ones on the port/left side are not fully formed. This will require very careful and delicate work (as its easy to damage the other windows).
Spotting Top/Starfish/Foremast- Quite accurate in shape. Due to the small scale, the starfish (Part H29) is moulded a tad thick, but this is acceptable for most modellers. Anyone wishing ultra-accuracy can replace the starfish with photoetch. Important- we've yet to see accurate photoetch of Hood's forward starfish. Not a single producer got it right for the 1/350 scale kit, but we are hoping they make the necessary corrections for the 1/700 scale kits. Please check the shape very carefully and make sure it is the same (albeit slimmer) than the kit's starfish. If it's wrong, don't add it.
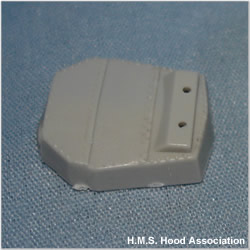
The only notable problem with this portion of the kit is the roof of the spotting top (Part B8). Trumpeter/Pit Road mistakenly cut a "notch" into the starboard side of this part (this is because this part was also used in their 1941 kit...which should have the notch). This notch was added to Hood in 1941 and therefore not present in 1931. This needs to be filled-in. See the photo to the right (taken in 1932) for proof.
Amidships/Aft Structures
 Funnels- Largely correct, but suggest hollowing out caps (C41) and replacing the funnel cages with photoetch. Also, Trumpeter/Pit Road moulded on two very heavy horizontal bands. There were similar features on the actual ship, but they were flat. The bands are way out of scale on this model and modellers should consider reducing them in height or even removing them.
Mainmast- The mainmast starfish (B35), shown in the image to the right (click to enlarge), is shaped correctly. Nevertheless, due to the medium and scale, the underside is moulded a bit thick. We suggest replacing starfish platform, main derrick pulleys and tackle with aftermarket photoetch. Add the diesel exhaust pipe up the port rear tripod leg using wire or tube styrene. A photo showing the appearance of the main mast starfish in the 1930s is shown to the right.
 After Superstructure- Put canvas over the square windows around the lower rear of the structure (H7, J3 & J4). This can be done with squares of sheet styrene. In most photos, this appears to have been a long curtain which covered several windows. Do not blend them into the structure, but make it look like the windows are merely covered.
There is one very major error in this area- the roof of the After Superstructure (Part B14). Trumpeter/Pit Road included a roof configured as in 1941. Of course, in 1931, the configuration was notably different- less splintershield coverage. To make this part accurate, the modeller will need to remove the splintershield at the narrow end and raise the height of the shield at the forward/wide end. This can be seen in the image to the right (click to enlarge).
Boats & Rafts
The shapes of the boats are accurate overall. They are, as is common in this scale, a bit plain though. It may be possible to augment some boats with photoetch, or replace them with aftermarket parts. Creative painting could also help as well. Of course, some shortcuts can legitimately be taken - Hood's Admirals Barge and open row boats were often canvas covered. I recommend taking advantage of this fact as it should save you some work.
The Carley Floats/rafts (Part C35) in my sample kit are terrible. They have no outer tube detail, but far too much rope line detail. They are entirely too small and look nothing like the very large rafts actually carried aboard Hood at that time. Hopefully Trumpeter/Pit Road have replaced these parts. If not, suggest modellers replace these with rafts from other kits. Also be sure to check the placement of the rafts...based on kit instructions I've seen online, Trumpeter/Pit Road tell the modeller to mount at least four of the rafts in wrong locations (do not mount them on the sides of the bridge!).
Aircraft
The Fairey floatplane provided with the model seems quite accurate. It should be more than adequate for the average modeller. I do suggest replacing the aircraft crane assembly (parts E15 & J6) with aftermarket photoetch though. Frameworks always look better in photoetch.
Other Suggestions
As always, just about any 1/700 scale ship model can benefit from additional detailing. The following are some generic suggestions:
- Replace all ladders (inclined and vertical), cable/hose reels, engine room vent grilles/mesh, wiring, etc, with photoetch.
- Add voice tubes with thin wire or strip stock
- Replace mast yards, flag staffs, etc., with photoetch, brass tubing/wire or plastic strip stock
- Add photoetch railings, doors and hatches. They simply look better than moulded examples.
- Don't over weather the ship when painting it. See our article on the Paint Schemes of H.M.S. Hood, 1920-1941
Photos of Completed Kit
Photos of completed Trumpeter/Pit Road 1/700 scale Hoods will be added to our Models Gallery.when they become available. So, if you have finished this model, please send us some shots!
Kit Build
If anyone has built this kit and would like to share the experience, please let us know. We'll gladly add an article here.
Aftermarket Parts
Existing Sets (from before this kit was released) - There are a number of existing photoetch sets for Hood, as sunk, in 1/700 scale. There is little specifically for Hood as she appeared in 1931 though. Fortunately, much of the 1941 photoetch pieces will work with this model. To see a current list of products, please see our review of the old Tamiya 1/700 scale Hood.
New Sets- We understand that KA Models of Korea is offering a wooden deck set for this model. We've yet to see or review this product though, so we cannot comment on it's accuracy. Additionally, Flyhawk Models has issued a new photoetch set for this model. Click here to learn more. If anyone out there has seen these products and would like to provide a review for our site, please let us know.
Other Reviews (Alphabetically Sorted)
- We will add links to other reviews as they become available.