Expedition Overview | Wreck Overview | Superstructure, Pt 1 | Superstructure, Pt 2 | Upper Deck & Barbettes | Secondary & AAA Guns | Hull Damage | Torpedo Damage | Assorted "Debris"
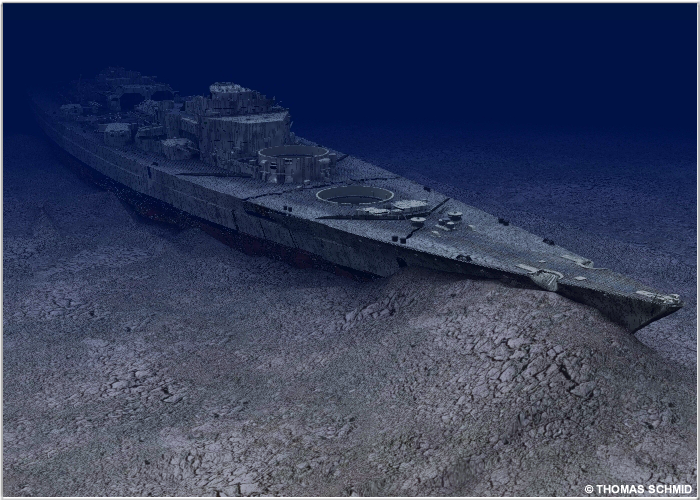
Schlachtschiff Bismarck Today.
You can view more of Thomas Schmid's great renderings at his 3D History web site.
Battleship Bismarck capsized and sank at approximately 1039 hours, 27 May 1941, following a fight with a superior British force led by H.M.S. King George V and H.M.S. Rodney. The ship had put up a most gallant fight in the face of impossible odds.
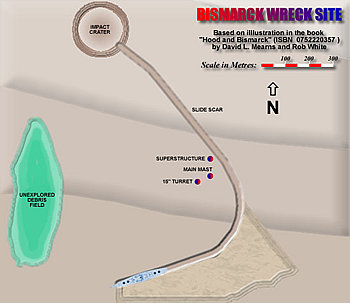
Above- A rough map of the wreck site based on an illustration in
the book "Hood and Bismarck" by David L Mearns & Rob White
The wreck of Bismarck is located on the south face of a massive extinct underwater volcano in the Abyssal Porcupine Plain of the eastern Atlantic Ocean. It is in the "vicinity" of 4809N 01607W. The main hull is located approximately half way down the volcano at a depth of roughly 15,715 ft / 4,790m.
It is believed that as the ship capsized on the morning of 27 May 1941, her stern and lighter structures (bridge tower, funnel, main mast, etc.) broke away and sank independently of the main hull. In addition to this, all four of her 15"/38cm main gun turrets also fell out. These large items plunged quickly to the bottom. A myriad of debris also dropped from her decks and sank at varying rates of speed.
Shortly after sinking, Bismarck righted herself and descended rapidly (@20 minutes) to the bottom. She struck the side of the volcano creating an enormous impact crater. The kinetic energy from this impact caused the hull to slide, bow first, down the 14.5° slope of the volcano. Lighter debris appears to have been carried along in the process.
The hull ultimately slewed to westward and came to rest roughly 5,000ft / 1.5km from the point of impact. Some heavy debris may have been run over or pushed forward by the hull and sediment during the slide. Light debris rained down onto various areas of the wreck site in the minutes following the bows slide. Some prior reports suggest that the hull and debris were carried down the mountain as a result of a mudslide. This is not necessarily the case- it would appear that the hull actually displaced large amounts of churned-up sediment during the slide, most especially when it cut to the west just prior to coming to rest. A mudslide would likely have obliterated much of the trenched carved by Bismarck.
Wreck Observations
The Channel 4 mission was actually the third expedition to the Bismarck site: The wreck was first discovered by famed underwater explorer Dr Robert Ballard in 1989. The wreck site was next visited in June 2001 by a team using the Russian research vessel Akademik Keldysh and its twin Mir deep-sea submersibles. Less than a month later, the Channel 4 expedition explored the site.
The Channel 4 team conducted three thorough dives at the wreck site:
- Dive 1- 0048-1930 hours, 08 July
- Dive 2- 1343 hours, 09 July-0206 hours, 10 July
- Dive 3- 0448 hours, 11 July-1206 hours, 12 July
The Bismarck portion of the expedition went quite smoothly despite some bad weather and minor technical problems (which are par for the course in ocean exploration). David Mearns and his team were able to make some significant initial finds/discoveries, the most notable of which include the following:
- Initial location of the famous shell hit through Bismarck's bow by H.M.S. Prince of Wales (which some alternative wreck reports mistakenly list as not being found)
- Initial location of the entire bridge tower structure
- Initial location of a 15"/38cm L48.5 SK-C/34 turret (different from the turret found by Ballard in 1989)
- Initial location of the main mast (with Signal Platform attached)
- Initial location of the foretop 34.5 ft/10.5 m gunnery director
- Initial detection of one of the midship aircraft cranes
- Initial inspection of the remaining rudder and screw
- Another first, was a live Internet "tour" of the wreck.
Due to the navigation and safety limitations of the tethered ROV, as well as strict adherence to the principle of "look but do not touch (or enter)", it was not possible to film any interior areas of the wreck. The team instead focused their attention on conducting a thorough forensic survey of all exterior shell, torpedo and sinking/impact damage. The following observations were made:
Many shell impacts of various calibres were observed at various points on the hull. There were many penetrations in lightly armoured areas, but significantly few penetrations of the armoured belts. There were a number of large openings beneath the armoured belts on both sides of the ship. These were determined to be locations of British torpedo hits- the damaged areas having been widened/expanded upon impact and the subsequent slide down the volcano. The stern was confirmed to have been shorn clean off, though the actual stern itself was not located. The stern break was closely examined and the screws and single remaining rudder (starboard) were imaged.
Topside, was a different story- the damage was much more severe, with the port side apparently taking the greater percentage of hits. Heavy splinter damage as well as numerous shell impacts, superficial and penetrating, were observed in the superstructure and weather deck. Heavy damage was noted in the vicinity of the armoured Conning Tower. The gunnery director was missing and the Conning Tower itself had taken one notable hit forward. The decking in front and to port was ripped open in two significant instances. The forward rangefinder was missing.
Immediately aft of the Conning Tower, the tower superstructure had detached (when the ship capsized). It left only the forward part of the Lower Mast Deck intact. The rear portion of this deck appears to have broken cleanly away- the weld lines left on the Upper Bridge Deck showed signs of welds from the detached decking (to include internal partitioning). The tower was found inverted, up-slope from the hull. The structure was found to be heavily pockmarked with shell and splinter damage. There was also a good deal of corrosion seen. Despite this, it was observed to be remarkably intact- its platforms (foretop and main gunnery control station minus its rangefinder, Upper and Lower Searchlight Decks, Admirals Bridge) as well as its base structure (the Upper Mast Deck) were still attached (though some were notably deformed in places). The rear half of the Lower Mast Deck did not appear to be attached to the tower structure. The 32.8ft/10m rangefinder was found nearby.
The funnel was missing, but remnants of its base, internal baffling and diesel exhaust pipes were observed. All three hangars were still in place, though each appeared to have taken direct hits. A particularly large area of damaged superstructure was noted on the port end of the aircraft catapult. This was originally thought to be a massive hole, but is actually missing superstructure and discolouration of the immediate deck area. Aft of this, the main mast and relatively light Signals Platform that was once atop the main hangar are missing (these were found largely intact and still connected together up-slope from the hull). Aft of this, the rear superstructure (including the two antiaircraft fire control stations, searchlight platform and aft gunnery control station, minus its rangefinder) is intact, though exhibiting signs of shell and splinter damage.

Plan and profile views of Bismarck's hull, courtesy of Thomas Schmid. Click each to enlarge.

Shell hits were found on or near each of the main gun barbettes. The most notable damage was noted at the barbettes for turrets "Bruno" and "Dora". The secondary and antiaircraft armament also showed signs of damage- each of the six 5.9"/15cm L55 SK-C/28 secondary gun turrets were observed to have taken direct penetrating hits. One turret, P1, was found to be missing the upper rear half of its gunhouse plating. The eight 4.1"/10.5 cm mounts (four L65 SK-C/33 and four L65 SK-C/37) were all still in place, though most exhibited signs of damage, either from the battle or the sinking. A number of the lighter antiaircraft guns were noted to be in place. One 15"/38cm L48.5 SK-C/34 turret (tentatively identified as "Caesar") was detected nearby, its internal rotating structure having been smashed, presumably by the ship during the slide. The team did not locate the other three main turrets.
Wooden decking was found to be quite intact. There were instances of damaged or missing planking, but these were in the immediate area of shell hits and/or spots likely subjected to fires. The paintwork of the ship is also remarkably intact and is still protecting much of the ship from corrosion. That should not imply that there is no corrosion- there was actually a good deal of it noted, but it seemed to be emanating from places where the protective paint had been blasted or burned away. The deck swastika markings are still present as are the white false bow waves painted near the bow. There are even signs of the famous black and white stripes worn on the ship during its Baltic training. The physical appearance of the ship is affected in various areas by sea life as well as notable quantities of sediments stirred-up during the slide.
In addition to the wreck, the impact crater and slide scar were well imaged. The two primary debris fields were not imaged in detail, and at least one major sonar target (possibly the funnel or the stern) was not explored. Beyond the wreck survey, the team also undertook one other very important task- the laying of the "Ehrentafel" (Roll of Honour) plaque commemorating each man who died in Bismarck.
Expedition Findings
The primary goal of the expedition was to examine the ship's remains in an effort to retell the ship's story as accurately as possible. To determine what the ship - and her men - experienced in the final days, hours and minutes of the ill-fated mission. Another goal was to try to get a better understanding of the reasons behind some of the British courses of action. The team were successful on both accounts.
One important conclusion reached by David Mearns is that the British gunfire was clearly not enough to sink Bismarck. The short ranges at which the British ultimately engaged Bismarck were simply not allowing shells to penetrate into her vital areas. To be blunt, the shelling was just rearranging debris on Bismarck's deck and causing unnecessary carnage. With this in mind, it is clear that Admiral Tovey's decision to cease shelling and to deploy torpedoes was quite correct.
David concluded that the torpedoes were a significant contributing factor in Bismarck's sinking: He believes that Bismarck was sunk by flooding resulting from shell hits, damage sustained in the Swordfish torpedo attacks (survivor accounts noted the ingress of water aft), flooding/counter-flooding due to the German's own damage control to put out internal fires, and of course, the final torpedoes. He cites that the ship was clearly wallowing before the scuttling actually began and most decisively, the ship rolled over and sank in conjunction with the impact of Dorsetshire's last torpedo. He does not dismiss the reports of scuttling, but believes that this only hastened the inevitable by a matter of minutes.
Footnote from web site Staff
Although this article deals specifically with the findings of the Channel 4 expedition, we would be remiss if we did not briefly acknowledge a subsequent expedition: In May/June 2002, a team led by film director James Cameron, visited the Bismarck wreck. His wreck assessment was largely similar to that of Channel 4, with the notable exception of the effects of the torpedo damage- Mr Cameron concluded that the torpedoes played no part in the sinking and that scuttling alone was responsible. David Mearns stands by his own expedition's original findings.
Anyone wishing to learn more about the battleship Bismarck should visit one of the two sites listed alphabetically below. They are without doubt the best online sources of information:
Battleship Bismarck Bismarck and Tirpitz
Photos and descriptions of damage to various parts of the wreck can be accessed through the text links at the top & bottom of this page. Please understand that it is not our intent to display or provide a detailed technical analysis of every single instance of damage, but rather, to give an overview of what was observed.
Expedition Overview | Wreck Overview | Superstructure, Pt 1 | Superstructure, Pt 2 | Upper Deck & Barbettes | Secondary & AAA Guns | Hull Damage | Torpedo Damage | Assorted "Debris"