Expedition Overview | Wreck Overview | The Bow | The Midsection | The Stern | Debris, Pt 1 | Debris, Pt 2 | Debris, Pt 3 | Memorial Plaque
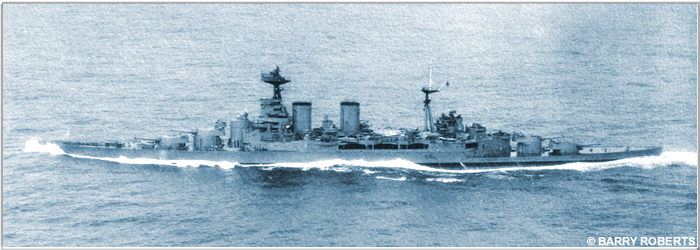
22 May 1941- H.M.S. Hood en route to her disastrous engagement with Bismarck and Prinz Eugen.
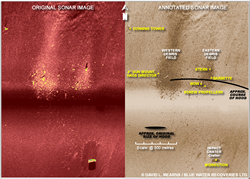
Above - Sonar image of the wreck site (original
on left, enhanced on right).
Click to view the original image.
H.M.S. Hood sank at @0600 hours, 24 May 1941, whilst engaged in battle against the German warships Bismarck and Prinz Eugen. All but 3 of her compliment of 1,418 crewmen went down with the ship. It was the single worst Royal Navy ship loss of the Second World War.
Two subsequent Admiralty Boards of Inquiry concluded that one or more 15"/38cm shell from Bismarck penetrated Hood causing an explosion in her aft magazines. This explosion broke the ship's "back" and caused her to split in half. The stern sank immediately, followed by the bow shortly thereafter- the elapsed time was roughly three minutes.
The wreck had lain undisturbed for over 60 years until its discovery by David Mearns's team on 19 July 2001. It lies in the Irminger Basin of the Denmark Strait between Iceland and Greenland at a depth of approximately 1.7 miles (9,334ft / 2,845m). It is in the "vicinity" of 632200N 0321700W (exact position will not be released), or roughly 270 miles / 400km west-southwest of Reykjavik, Iceland.
Expedition Observations
The team located the wreck using the Ocean Explorer 6000 sonar surprisingly quickly- in just 39 hours. This was no doubt, attributed to the 6 years of in-depth research and planning that preceded the mission. As to be expected with any deep sea expedition, there were minor technical and weather problems, but these did not adversely affect the mission. The team were ultimately able to conduct four dives on Hood with the Magellan 725 ROV:
- Dive 1- 0811 hours, 20 July-0015 hours, 21 July
- Dive 2- 0940 hours, 21 July-1125 hours, 23 July
- Dive 3- 1440 hours, 24 July-0211 hours, 25 July
- Dive 4- 0530-1803 hours, 25 July
The wreck was found to be composed of three main sections- the bow, midsection and stern. There were also a myriad of pieces varying in size and complexity, deposited in two heavy debris fields (see the sonar image). The topography of the site was noted to be relatively flat. It is subject to a tidal current that degrades visibility. It tended to stir up notable quantities of fine, silt-like sediment. The effect was described as being similar to driving at night with headlights on during a snow storm. Fortunately, there were periods in which it subsided, thus affording the team opportunities to make observations and to take clear photos/video.
Due to the navigation and safety limitations of the tethered ROV, as well as strict adherence to the principle of "look but do not touch (or enter)", it was not possible to film any interior areas of the large wreck sections. The team instead focused their attention on conducting a thorough forensic survey of the exteriors of the ship, as well as the great amounts of interior/exterior wreckage in the debris fields.
The Bow
The bow lies in the eastern debris field, approximately 650ft/200m Southwest of the stern. It is roughly 100 ft/ 30.5 m long. It is lying on its port side and appears to be mostly a shell, with most of its internal decking and structures either gone or collapsed deep within. Though still clearly recognisable, the bow is notably deformed (depressed/crushed) below and aft of the hawse pipes. Its anchor cables stream out in different directions, but the anchors themselves were not seen.
The bow detached somewhere between the forward curvature of "A" barbette and the capstan gear. This is also roughly where the single keel ended and the box keel began. It is corroded and coated with a thick layer of sediment. There appears to be very little of its Home Fleet Dark Grey paint remaining, but some lighter items such as the degaussing cable and smaller chains were still attached. The Roll of Honour plaque was ultimately laid next to the bow by Ted Briggs on 25 July 2001.
The Midsection (Main Hull)
The midsection is the largest piece of wreckage at the site. It lies within a massive impact crater approximately 2,300ft/700m south of the bow and the eastern debris field. It is at least 328ft/100m in length (possibly more), and reaches from just before the forward curvature of "A" barbette, back to one of the bulkheads of the Forward Engine Room (the exact bulkhead is unclear).
"A" barbette is in place and still has the decking of its gun house fitted (though half buried in the mud). There was no sign of the guns, walls or roof plates of the gun house. "B" barbette is also in place, though the end is entirely buried in the mud. As a result, it was not possible to determine if its gun house is still seated. Immediately aft of the turrets the conning tower is missing (it was ultimately found roughly 4,593ft/1.4km northwest of the midsection). The port-side decking adjacent to the barbettes and Conning Tower was found to be either heavily depressed or missing. This enabled the ROV to manoeuvre between the barbettes somewhat. There was no sign of any superstructure due to the mud line.
Heavy damage was noted on the starboard side of the hull- it appears to be missing most, if not all of its torpedo bulge plating. The bottom of the hull, now the top, is pockmarked with various instances of of implosion damage. The great degree to which the metal stretched indicates it was actually quite strong and not of substandard quality as some researchers had previously theorised. Both broken ends of the hull are very jagged and irregular, but the forward end is more splayed-out than the after end. Its plating looks as though it had been blasted outward and back. The greatest area of damage is to starboard.
The midsection appears to lie flat on the ocean floor, but footage of the forward end and both barbettes indicates this end of the hull is at an angle of approximately 30-45°. No major compression folds or fractures were noted in the hull, so it is not believed that the midsection is actually twisted or warped. Its highly possible that the odd angle of the forward end is caused by undulations in the sea floor.
The midsection is corroded in places and coated by a layer of sediment. Despite this, there are signs of the Home Fleet Dark Grey paint worn on Hood's exterior, as well as the white paint used on her interior. The underside red, already well worn/faded in May 1941 (it had been several months since the underside was painted and Hood had seen a good deal of action since), was almost non-existent.
The Stern
The stern section is located in the eastern debris filed, northeast of the bow. It is approximately 125ft/38m long overall and is composed of two main segments: The rearmost segment (very end of the stern) is quite intact and is sticking up from the seabed at an angle of about 45°, while also canting to starboard somewhat. This rear segment is roughly 75ft/23m in length.
A strip of the port side armoured plating measuring roughly 49ft/15m in length is blown back and lying parallel to the rear stern segment. Apparently, it was blasted loose from the forward portion of the quarterdeck but remained attached to the rear portion of the stern during the explosion and sinking. The two innermost screws are attached and resting on the sea floor. The rudder is also in place and intact. It is locked (by worm gearing) in what appears to be a 20° turn to port.
Barely attached to the upraised stern is a "flap" of the upper portion of the quarterdeck. It, and some underside supporting structure, lies flat on the seabed. Portions of this foremost segment extend all the way forward to the rear curvature of "Y" turrets barbette opening. This segment is roughly 50ft/15m in length.
Though heavily damaged/distorted to port, in front and below, the stern is nonetheless in good condition. This is surprising when one considers how close it was to the seat of the explosion. The planking is amazingly intact as are nearly all deck fittings. Even the ensign staff base, some portholes, degaussing cable, mushroom vents and a few stanchions remain. Though corroded and plated with sediment, the stern still shows traces of its Home Fleet Dark Grey paint, though little to no trace of the underside red (looks very dark).
Assorted Debris & Wreckage
When Hood exploded, she was in a turn, moving at high speed. The initial conflagration and subsequent blast blew apart portions of the hull structure beneath and adjacent to the rear turrets. As the ship's momentum carried her forward, the heavily damaged areas bordering the explosion zone were quickly rent apart by in-rushing water and subsequently collapsed. Something similar happened when the bow detached. The contents of these areas (shown in red in the illustration below) were subsequently ejected and formed two main debris fields.
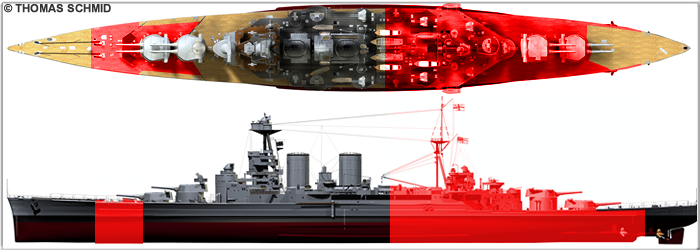
You can view more of Thomas Schmid's great renderings at his 3D
History web site
According to David Mearns, the fact that there are two distinct debris fields, indicates that there were two distinct and catastrophic events. He believes that the eastern debris field indicates where the initial aft explosion occurred. He bases this upon the fact that certain key pieces of wreckage associated with the stern were observed within this debris field. The most notable examples (other than "Y" barbette and the stern itself) are the pair of outboard shafts and screws found lying side-by-side.
David believes the western debris field indicates the location of the bow separation. He bases this in-part upon the location of key bow-related wreckage (such as the forward breakwater), and upon the fact that Hood was roughly on a westward course. After the initial explosion, she would have quickly slowed down, but there would have been sufficient forward momentum to account for space between the two debris fields.
Of course, it should be noted that stern wreckage is not exclusive to the eastern debris field, and that bow wreckage is not exclusive to the western debris field. Indeed the presence of the bow in the eastern field, and items such as 4" gun mounts in the western field, does complicate the situation somewhat. David attributes this to the fact that the pieces took a glide plane during their descent. The large midsection is an excellent example of this- it is well to the south of the bulk of the other large sections and debris fields. Another factor is that ocean currents would have been responsible for "sorting" the wreckage to some extent. This would account for the sporadic debris between and near the two large concentrations.
Most, but not all of the heavy debris was filmed and examined in detail. Large amounts of external plating, internal support structures, bulkheads, decking, pipes, beams were found both scattered and in large piles. Some of the notable debris reported includes, but is not limited to: crockery, boots, a HACS Mk III* director, engine/propulsion parts, both forward/outboard screws, propeller shafting, both rear main gun barbettes, a 4" gun mount, a 0.5" machine gun pedestal, half of a torpedo, electrical gear/wiring, the intact foremast and starfish platform, much of the after superstructure, a bell, pieces of the forward breakwater, large quantities of 4" brass cartridges (minus their warheads), plus a number of large sections of the hull complete with internal structure. The intact Conning Tower was also located, but significantly west of both main debris fields. Photos of some of these items are included in our coverage here.
Expedition Findings
Though not all questions were conclusively answered, the expedition was nonetheless an outstanding success. Its main achievements were as follows:
- The initial discovery of the wreck of Hood and the first exploration and imagery of the wreck
- Confirmation that Hood was destroyed by a large conflagration/explosion in her aft magazines. Though it is true that no "smoking gun" (such as a telltale 15"/38cm shell hole in some external plating) was found, the damage fits what one would expect from a conflagration/explosion of 112 or more tons of cordite. There are alternative possibilities, but a shell from Bismarck still appears to be the most likely culprit.
- Confirmation that Hood had definitely been in the midst of her final 20° turn to port. Prior to this, many people, to include the members of the second Board of Inquiry into the loss of Hood, doubted that this final turn to port was ever executed.
- Discovery that there was catastrophic damage to Hood's bow as well as the aft section. This was indeed the main surprise for the expedition team. The mechanism for the bows detachment was hotly debated amongst the team members with two very different possibilities ultimately being drawn. One is that the forward magazines exploded, and the other is that the bow detached due to stress and implosion. David Mearns firmly believes that a second explosion of equal, or greater strength to the one that originally broke the ship's back aft, occurred in the ammunition spaces near the forward turrets and the Conning Tower. For evidence, David cites the "birds eye" view sonar image which shows that the debris field associated with the forward hull break is larger than that of the stern break debris field. David also cites some specific eyewitness statements from Prince of Wales crewmen (CPO French, CPO (O) Westlake and LtCdr Rowell), the odd location of the Conning Tower and the devastated appearance of the forward part of the midsection. For more details, please consult his book, "Hood and Bismarck".
- A better understanding as to why so few crew survived the sinking.
- Placement of the Roll of Honour plaque. Each and every one of the 1,415 men lost in the sinking is now memorialised at the wreck. They all have a proper grave marker.
Based upon the findings of David Mearns, the scenario for the loss of Hood is now as follows: Just before 0600, as Hood was in the midst of a 20° turn to port, one or more 15"/38cm shells from Bismarck penetrated and detonated in one of the aft magazines. This instantaneously spread to the other rear magazines and the ship suffered a massive conflagration/explosion. This caused massive damage to the surrounding areas of the hull and broke the ship's back (keel).
As the stern detached, a large portion of the adjacent area of the hull was wrenched apart and/or collapsed. The detached stern sank first, followed shortly by the damaged adjacent areas. The ship's forward momentum likely assisted in the collapse. The damaged rear areas then helped pull the bow under for its rapid descent. During its plunge, either just before or just after leaving the surface, the bow suffered massive internal damage from an internal explosion. Subsequently, the bow detached and a notable area of the forward hull broke apart in the process.
The stern sank more or less straight down, but the bow followed a glide plane to the east. The midsection, its hydrodynamic hull shape drastically altered, took a southerly glide plane and landed inverted. The various pieces fell to the ocean floor, with some heavy objects taking angular glide planes down and with some lighter items distributed by ocean currents.
The catastrophic nature of the dual explosions and the rapidity of the sinking account for why there were so few survivors. Indeed, it is surprising that even three men survived the sinking of the Mighty Hood.
Photos and descriptions of damage to various parts of the wreck can be accessed through the text links at the top & bottom of this page. Please understand that it is not our intent to display or provide a detailed technical analysis of every single instance of damage, but rather, to give an overview of what was observed.
Expedition Overview | Wreck Overview | The Bow | The Midsection | The Stern | Debris, Pt 1 | Debris, Pt 2 | Debris, Pt 3 | Memorial Plaque